Workflow Configurations
Every workflow in Plateau Studio has a set of configurations that you manage through the General panel. This page walks you through each section so you can set up your workflow correctly.
How to Open the Workflow Properties
- Open your workflow model in the Flow Editor.
- Click on an empty area of the canvas (make sure no step is selected).
- The General panel appears on the right side of the screen.
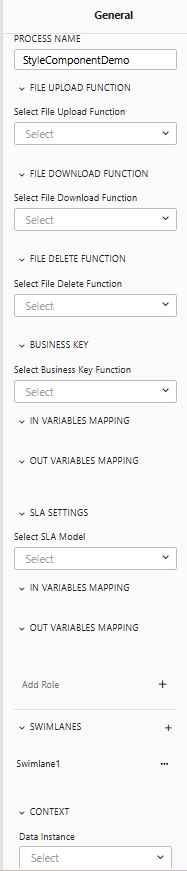
The panel contains the following collapsible sections, from top to bottom:
| Section | What It Is For |
|---|---|
| Process Name | The name of your workflow |
| File Upload / Download / Delete Function | Flows that handle file storage operations |
| Business Key | The flow that generates a unique identifier for each process |
| In Variables Mapping | Input variables passed into the workflow when it starts |
| Out Variables Mapping | Output variables sent back when the workflow finishes |
| SLA Settings | Deadline configuration for the workflow |
| Add Role | Roles used for access control in this workflow |
| Swimlanes | Team queues used for task assignment |
| Context | The business data your workflow carries (Data Instance) |
Each section is explained in detail below.
Context
The CONTEXT section at the bottom of the panel is where you define the data your workflow will work with. The most important item here is the Data Instance.
Click the Data Instance dropdown and select a DataType model that you have already created. This DataType defines the fields your process will use (such as customer name, request amount, approval status). Once linked, these fields become available throughout your workflow — in expressions, mappings, forms, and decision conditions.
The context also includes three items that are filled in automatically and do not need configuration:
- Process Instance — System info about the running process (status, tasks, participants, deadlines)
- Current User — The person performing the current action (name, email, roles)
- Action — Which button the user just clicked (Approve, Reject, etc.)
In Variables Mapping and Out Variables Mapping
- In Variables Mapping — Define input variables that get passed into the workflow when it starts. For example, if another system kicks off this workflow, it can send along a customer ID or request type.
- Out Variables Mapping — Define output variables that the workflow sends back when it finishes. Use this when another system needs to receive results from the completed process.
For example, to set up automatic business key generation, you would select your key generation service, tell it which field to use as a base (such as the department name), and tell it where to store the generated key.
Using Dynamic Values
Many settings in a workflow support dynamic values, which let you use live data instead of fixed text.
| Type | What It Does | Example |
|---|---|---|
| Fixed text | A value you type in directly | "Approved" |
| From context | A value pulled from the process data | The applicant's name from the data instance |
| From input | A value pulled from the starting data | The request type passed in when the process started |
| From output | A value pulled from the results | The final decision after the process completes |
Dynamic values are available in places like labels, role assignments, team assignments, and deadline intervals, making your workflow flexible and adaptable to different situations.