MiniApp Development Starter Guide
MiniApp applications are mobile apps that run on top of the SuperApp shell application and developed in Plateau Studio and integrated into the SuperApp using Plateau Studio.
SuperApp Portal is the platform where the lifecycle of MiniApps is managed. SuperApp Portal serves as a centralized hub for hosting and managing MiniApps, streamlining the versioning and management processes of your Plateau Studio creations within the platform.
This document will walk you through the necessary steps and guide you to integrate your application for publishing your applications developed in Plateau Studio to the SuperApp Portal.
To intagrate your MiniApp's to the SuperApp, follow these steps:
Create Organization
Ensure you are part of an organization that has permission to publish to the SuperApp. If you are not yet a member, contact your organization’s administrator to be added.
For more detailed information about the organization structure in Plateau Studio, click See More.
Create Application
Use Plateau Studio’s intuitive components and features to design and build your mini-application.
You can follow the steps below to create your application quickly:
Define Your App Pages: Begin by determining the pages of your application. You can decide whether you need to utilize Block Components or not. For more detailed information, click See More.
Create Pages: Create your pages and use the Folder Structure for easy management of your application pages. For more detailed information, click See More.
Set Application-Wide Styles: Establish styles that are consistent across your application by defining them in Settings > Theme interface. Implement these styles across your pages as needed.
Utilize Styled Components: Streamline your page designs by identifying components that will be consistently used throughout your application. Create a custom set of Styled Components to expedite the design process.
UI Development
After following the previous steps, develop your MiniApps' UI screens in Plateau Studio, by creating your MiniApps' layout, dragging & dropping components, and many more.
For more detailed information about the UI page development steps, you can check our general documentation about how to use Plateau Studio or our quick Onboarding guide here.
- Create Block Components: Start by defining the UI screens according to your project requirements. Consider the application flow and desired user interactions. Determine the use of Block Components for more efficient page rendering. For more detailed information, click See More.
- Adjust UI Layout / Responsive: After creating your pages, use Container components such as Row, Col, and Card to construct the page layout. Utilize the Layout properties in the Style tab for responsive design, adjusting page layouts for different device resolutions. For more detailed information, click See More.
- Drag&Drop Components: Add the necessary components to your UI screens. Choose from a wide range of pre-defined Basic components or from Your App Components. If you need custom ones to fit your needs use Block Components. For more detailed information, click See More.
While developing your MiniApp, you can access detailed information about the components you are using via this link. If the component in question includes a mobile usage section, you should proceed accordingly.
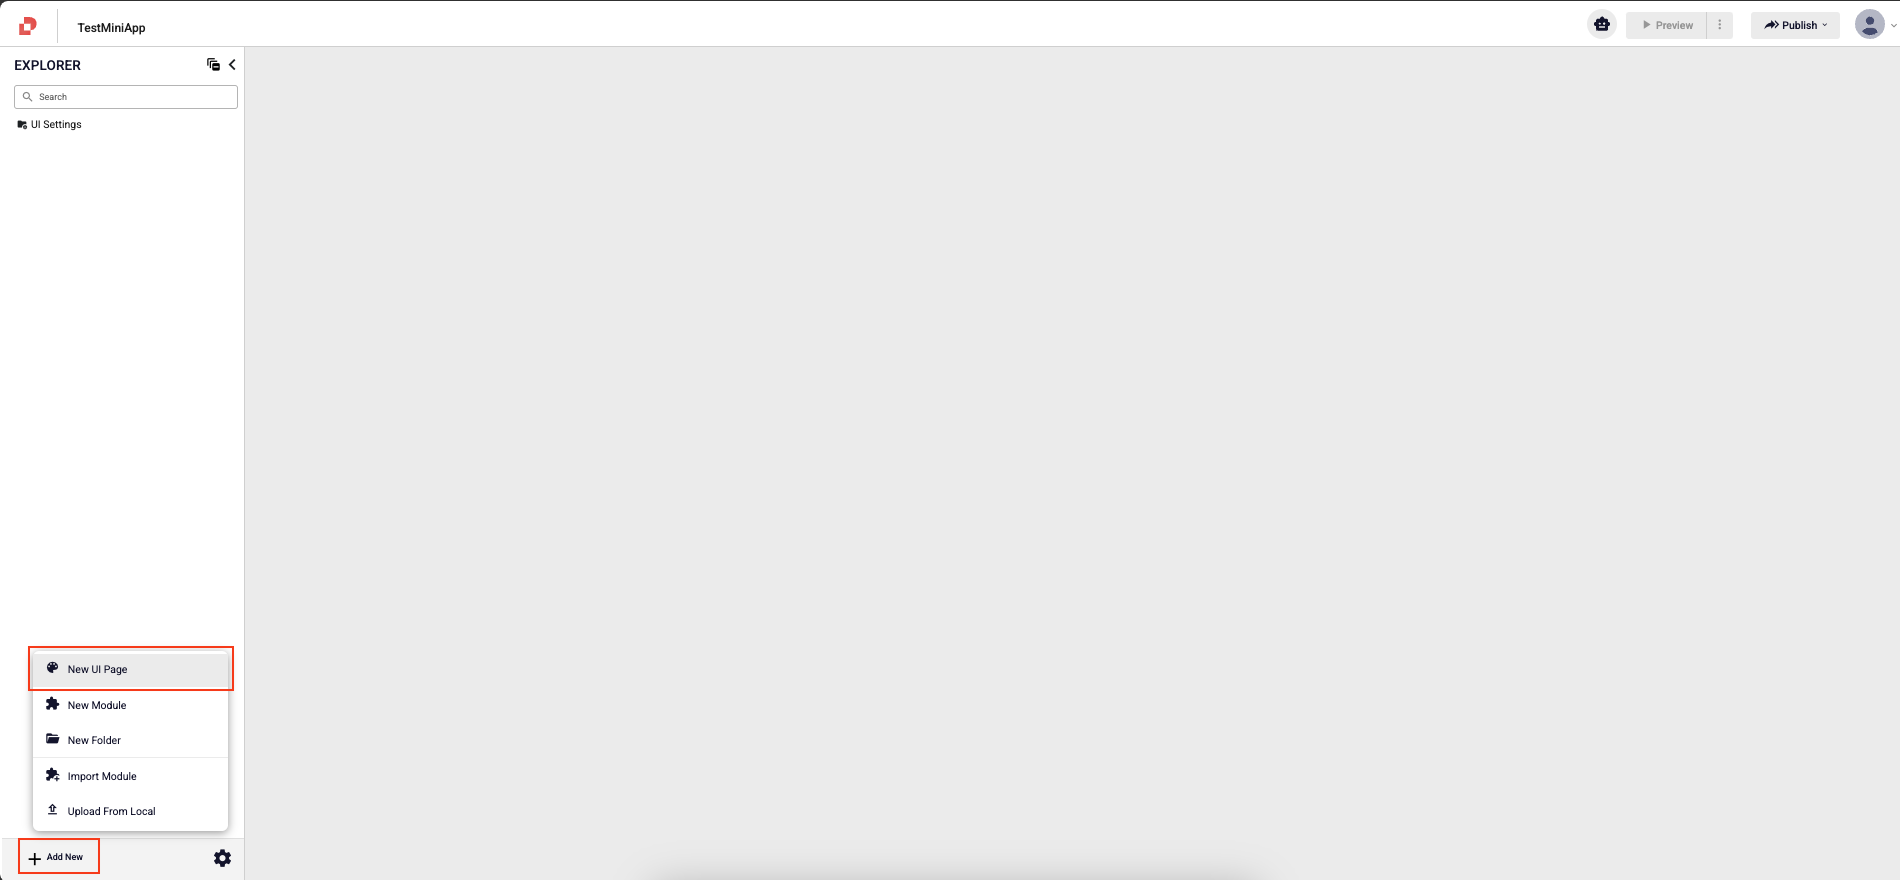
Using Template
Applications developed as MiniApps generally feature a splash screen as a starting screen. This screen serves as an onboarding flow to introduce the MiniApp to the user. Once users complete this flow, they are typically directed to a home screen that launches them into the MiniApp's functional workflow.
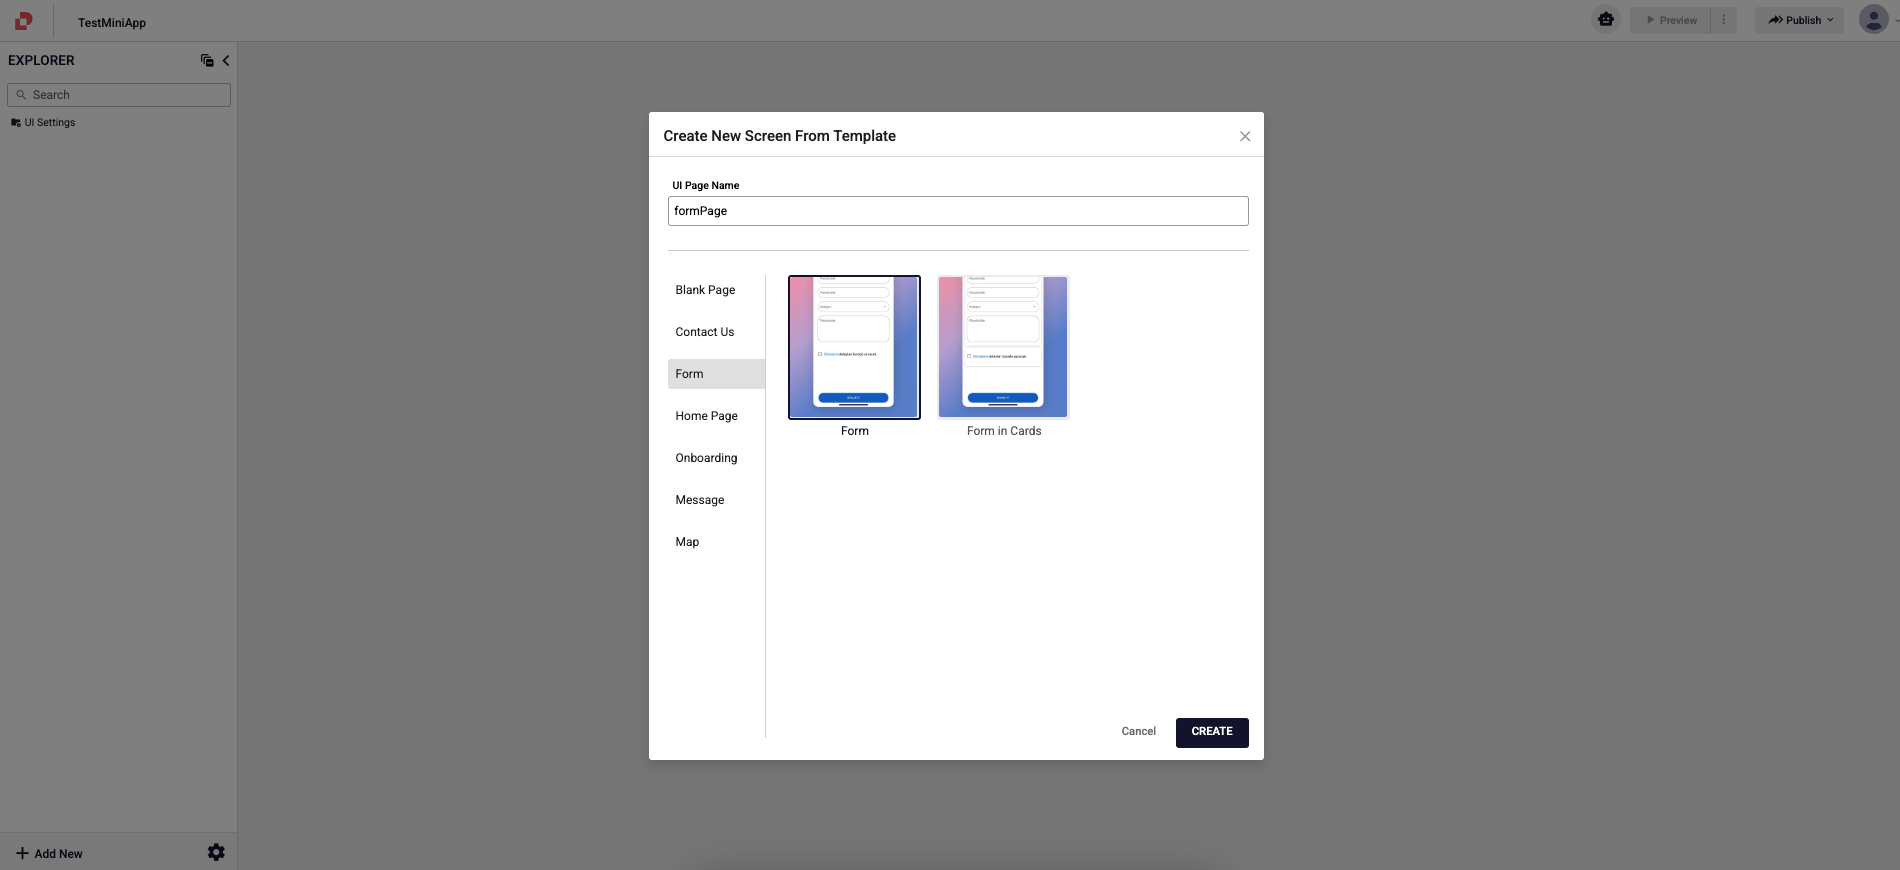
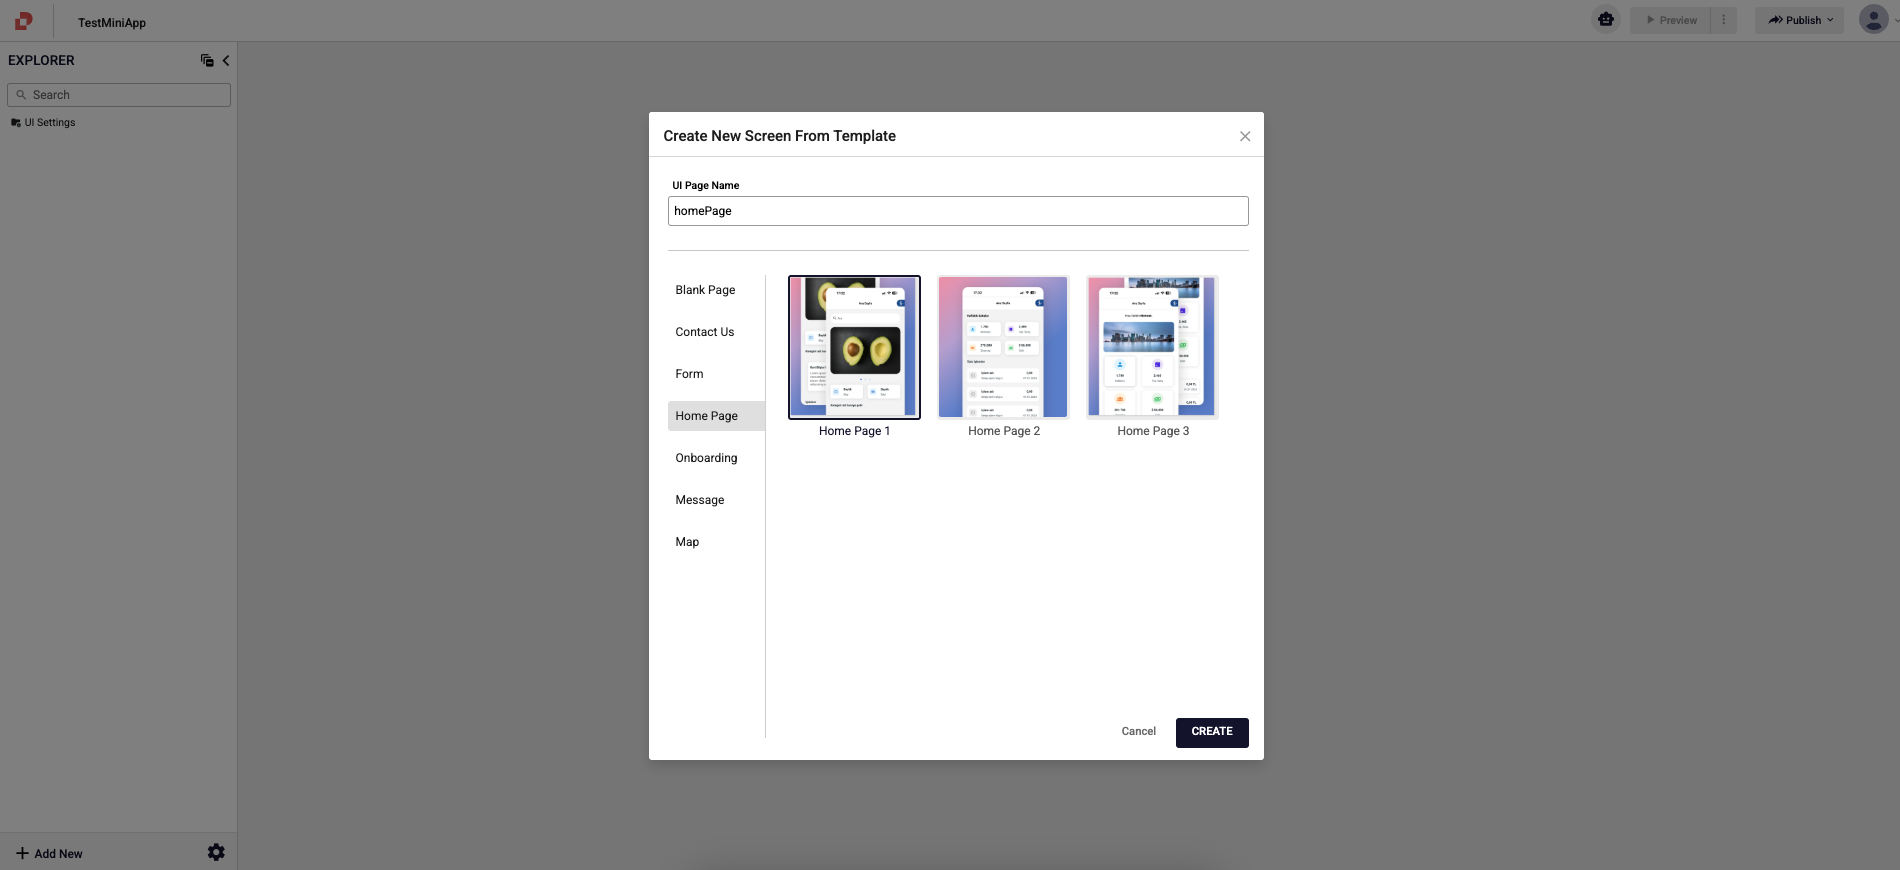
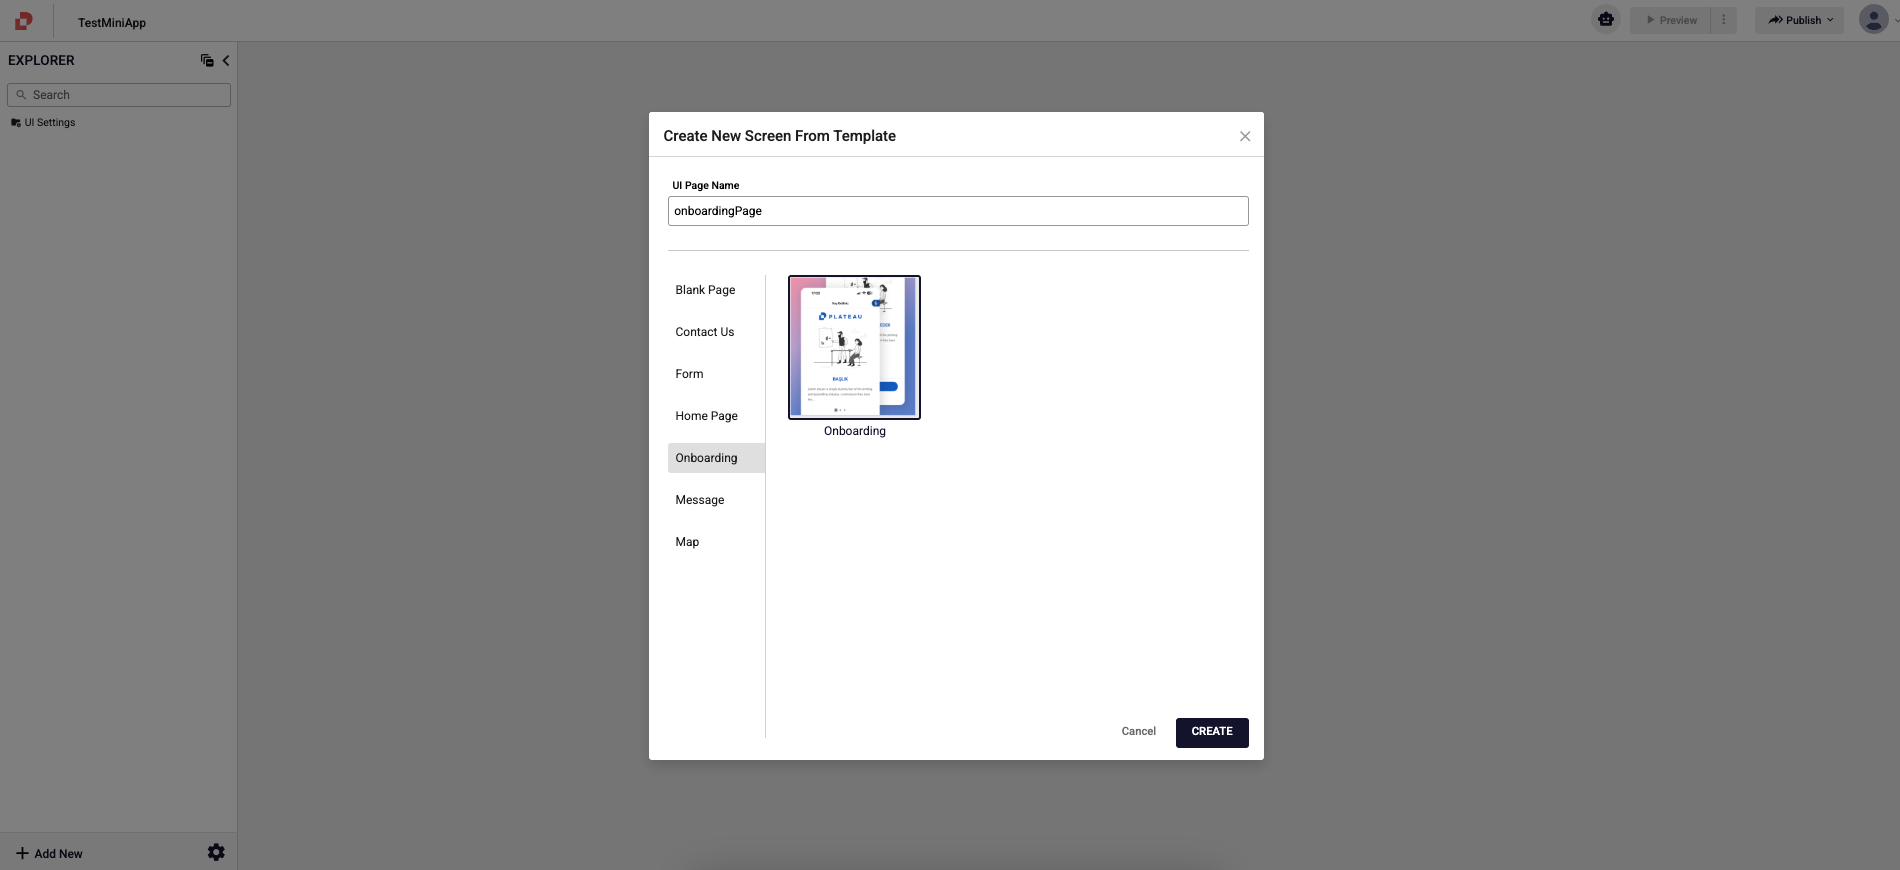
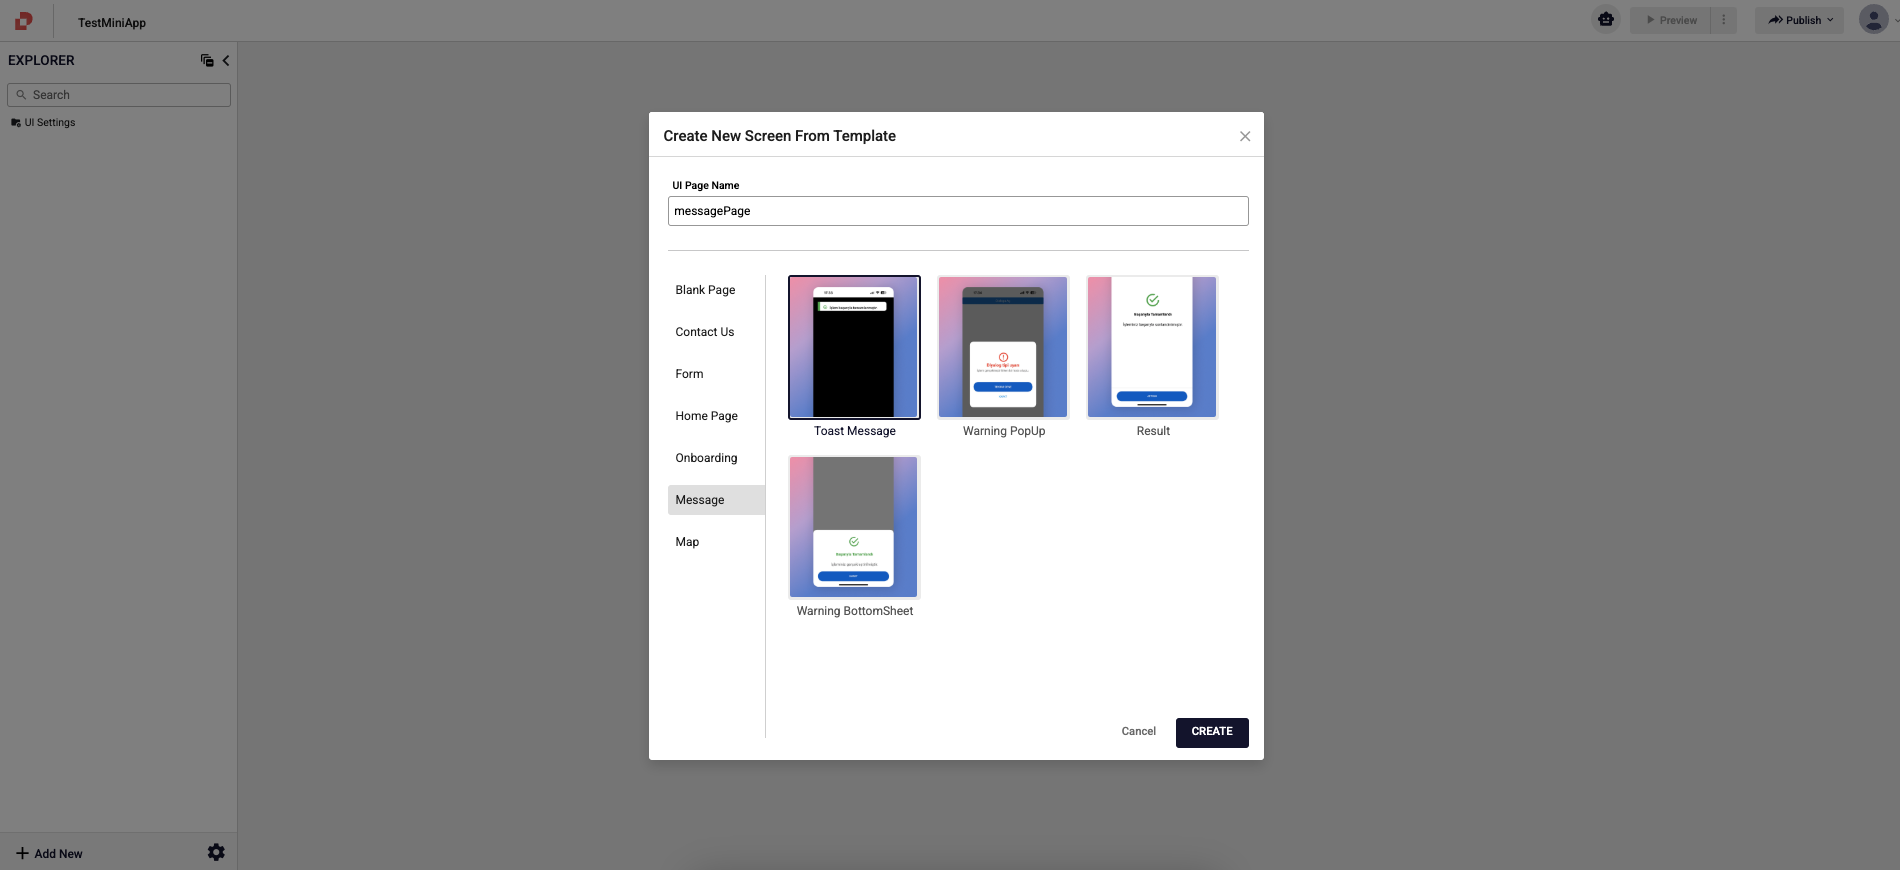
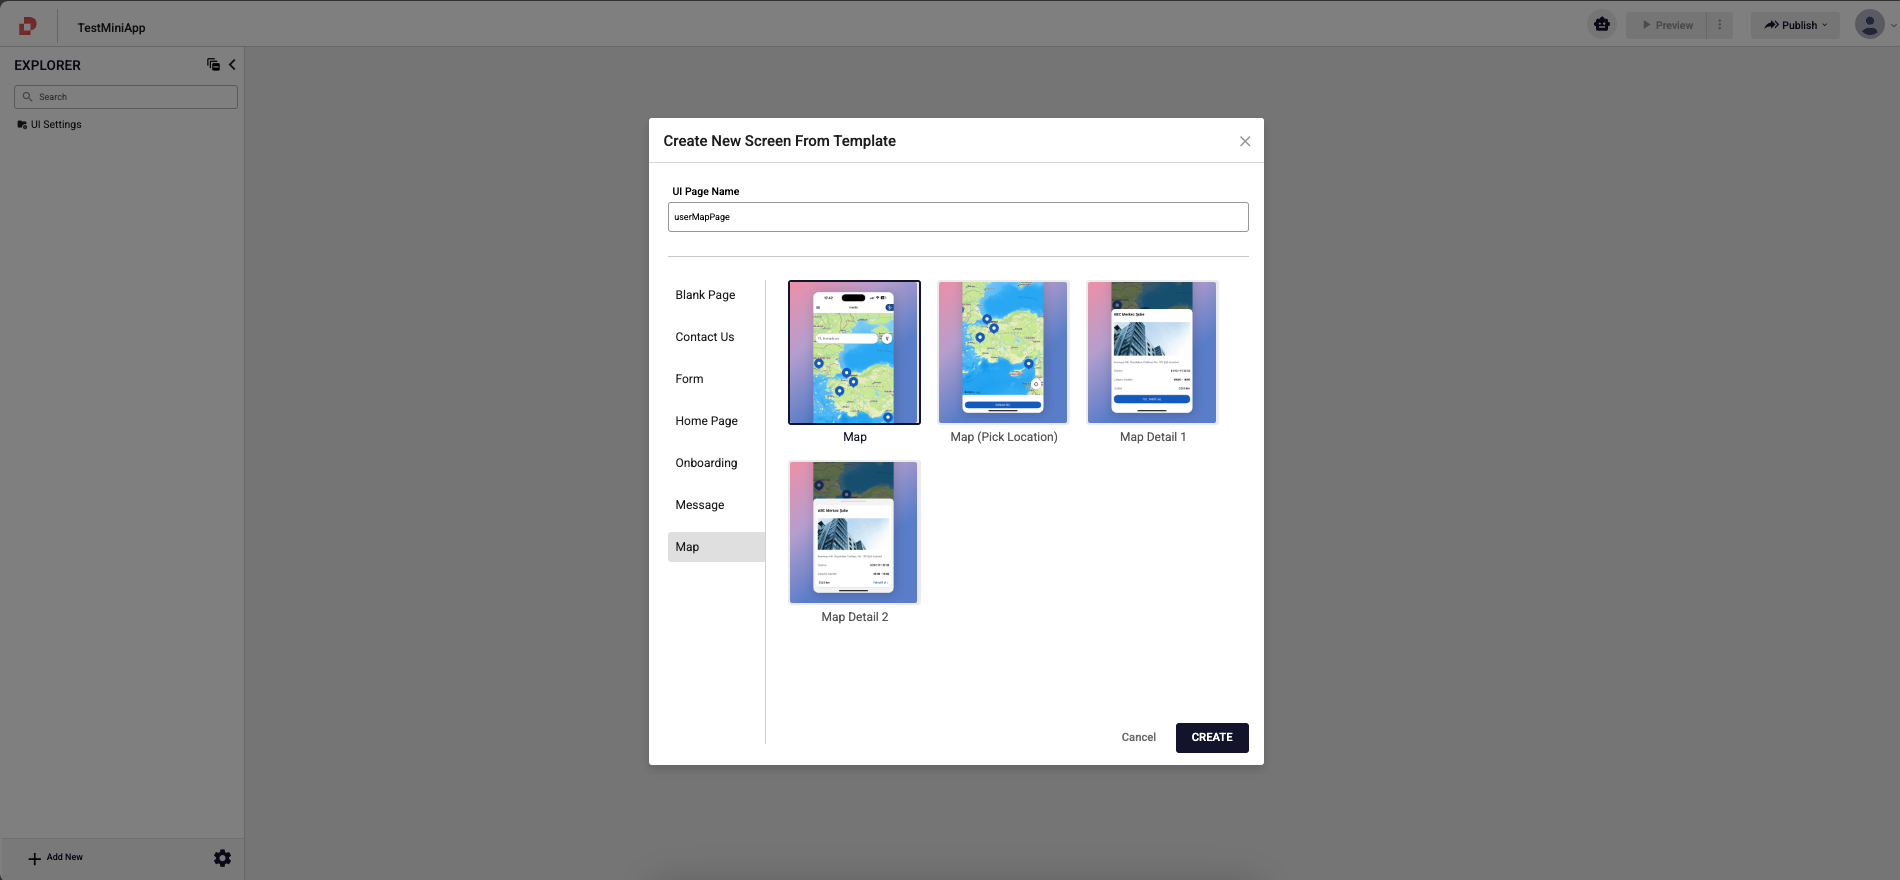
Other screens are primarily used to carry out the functional tasks of the miniapp and are therefore created with different content for each MiniApp. To speed up the creation of these screens, you can add template screen designs in the categories of contact us, form, homepage, onboarding, message and map in the Studio environment to your MiniApp and customize them to get the look you want, thus shortening the MiniApp development process.
To add these screens to your MiniApp, follow the steps outlined below.
- You can follow the steps below to add the contact us template page.

- You can follow the steps below to add the form template page.
- You can follow the steps below to add the homepage template page.
- You can follow the steps below to add the onboarding template page.
- You can follow the steps below to add the message template page.
- You can follow the steps below to add the map template page.
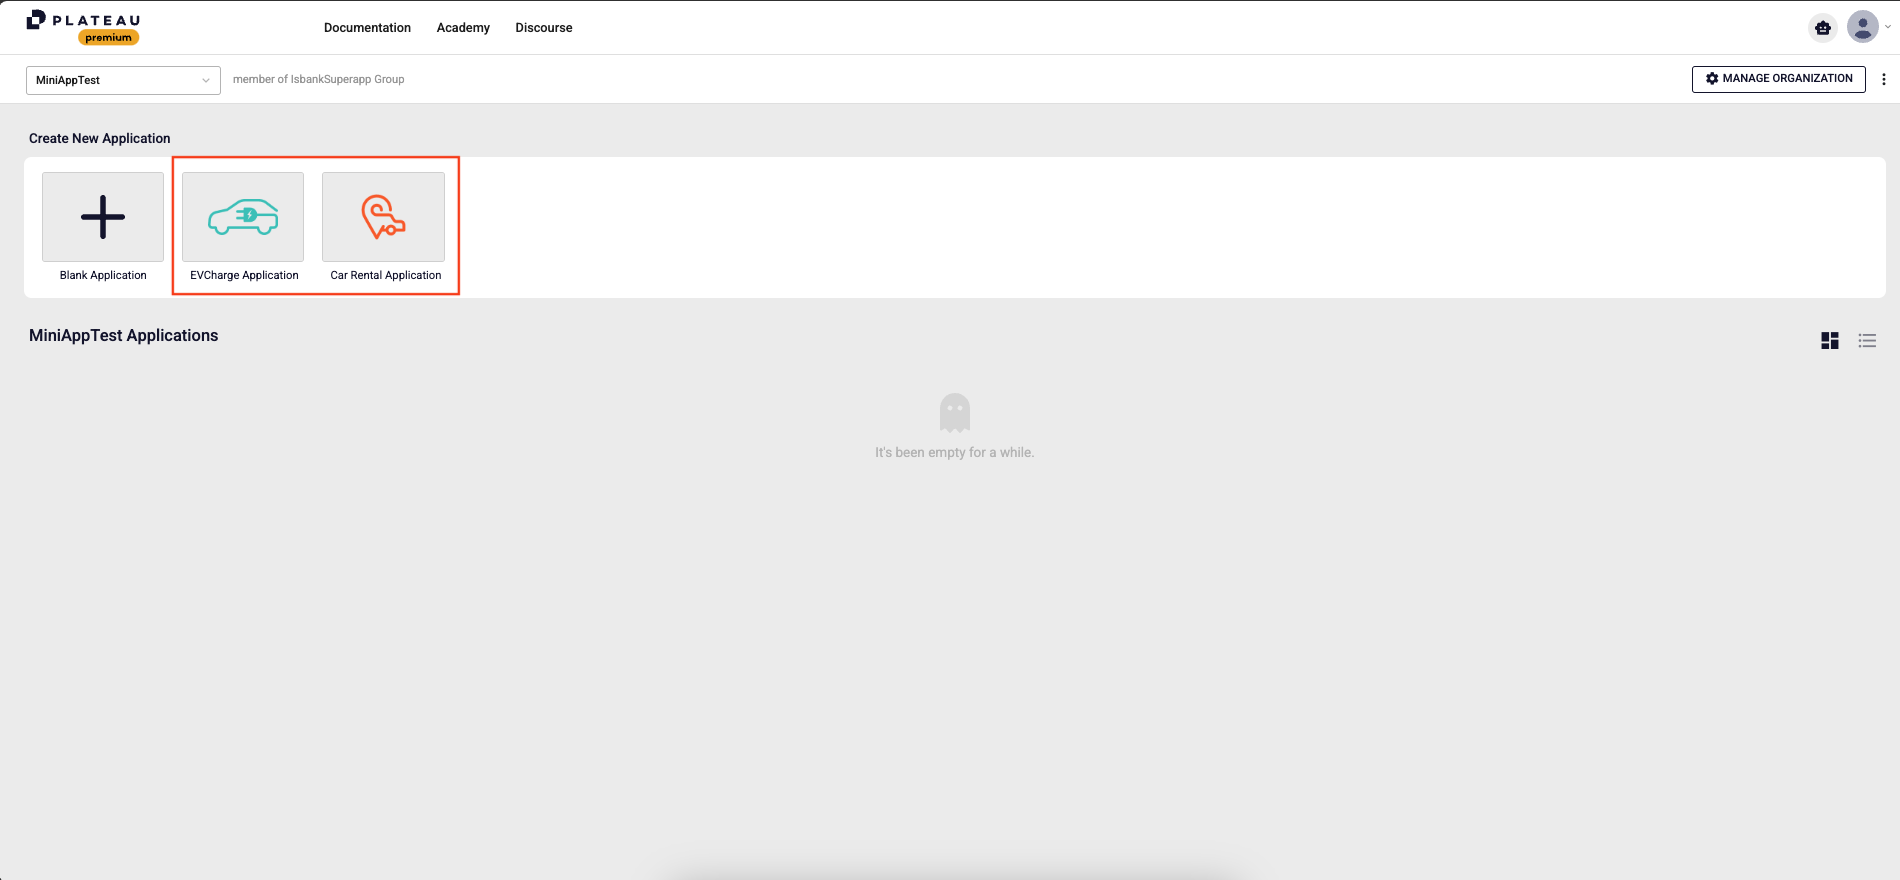
- Additionally, Studio provides ready-made app categories for MiniApp developers. For example, if you are developing a MiniApp for Car Rental Transactions, you can start with the Car Rental template or, if you are developing a MiniApp for Electric Vehicle Charging Transactions, you can begin with the Electric Vehicle Charging template.
- You can use the above ready-made template screens when developing a MiniApp other than the ready-made app categories Car Rental and Electric Vehicle Charging that Studio provides.
Using these example MiniApp templates or other template screens can accelerate your development process. To use the example MiniApp templates, follow the steps outlined below.
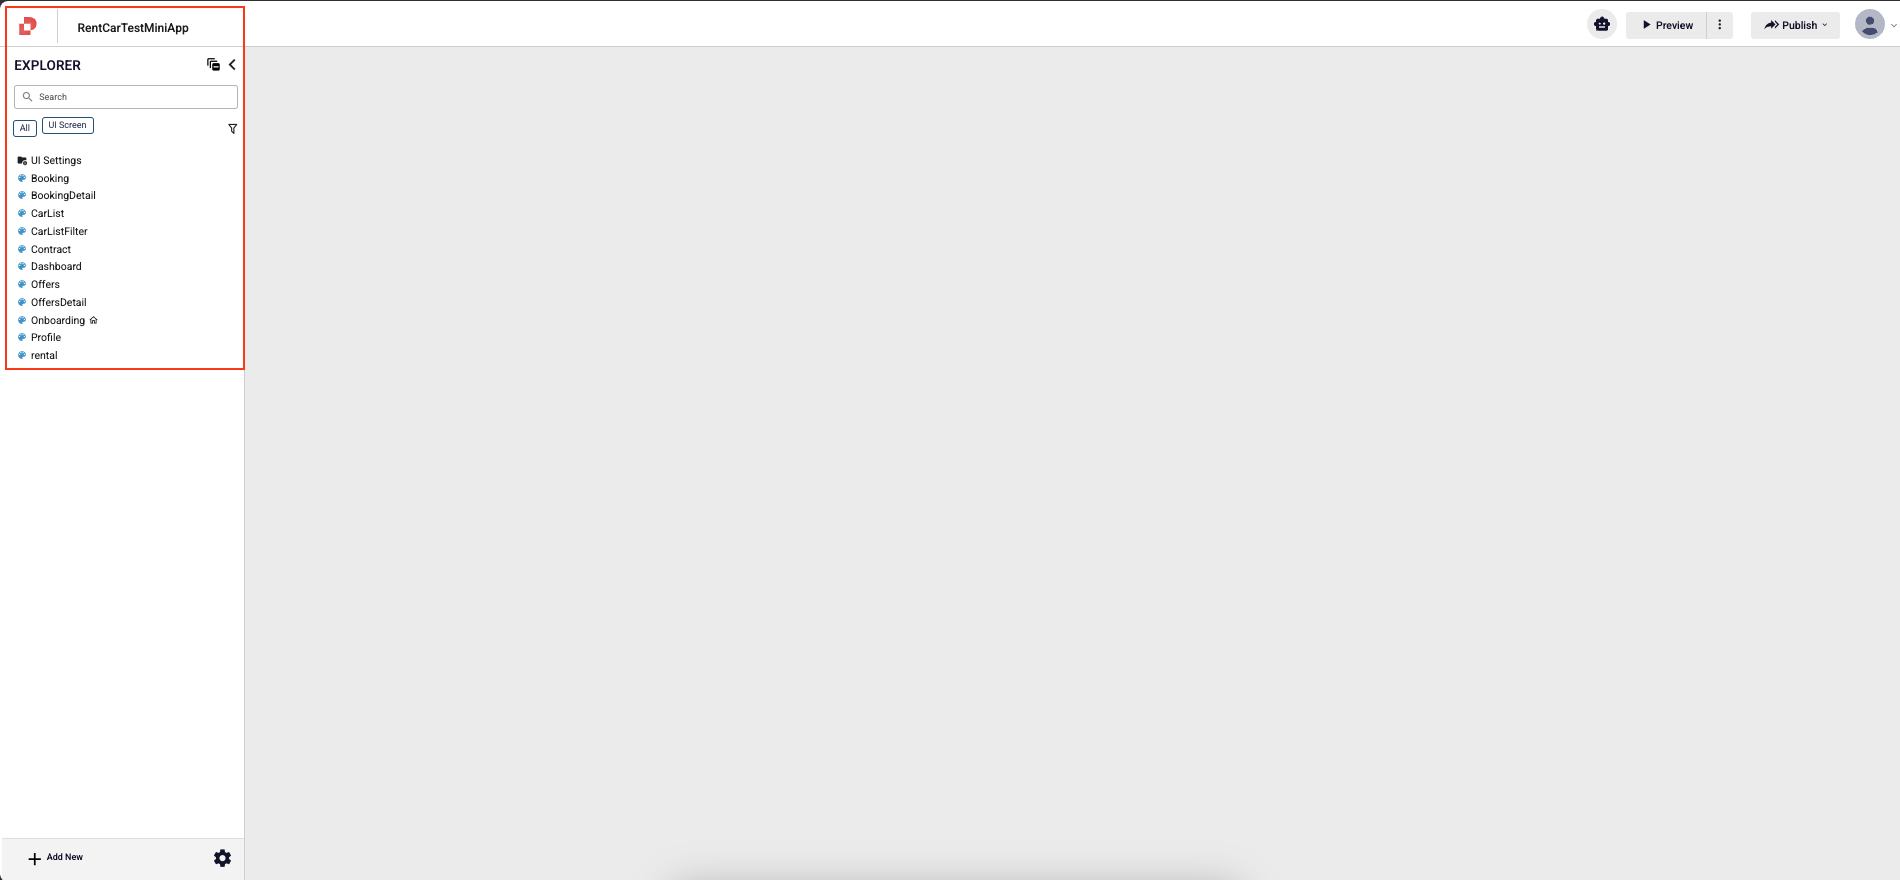
- If you add a Car Rental template application, MiniApp will come with the pages in the image.
- If you add a EV Charge template application, MiniApp will come with the pages in the image.
Preview Your MiniApp in Mobile
Preview Your Page
While developing your page, use the switch button on top of the Editor to preview. For mobile applications, download the StudioApps application, Using Mobile Preview app, scan the page QR code on the Editor, and see the changes you make on the Editor in real-time on your phone.
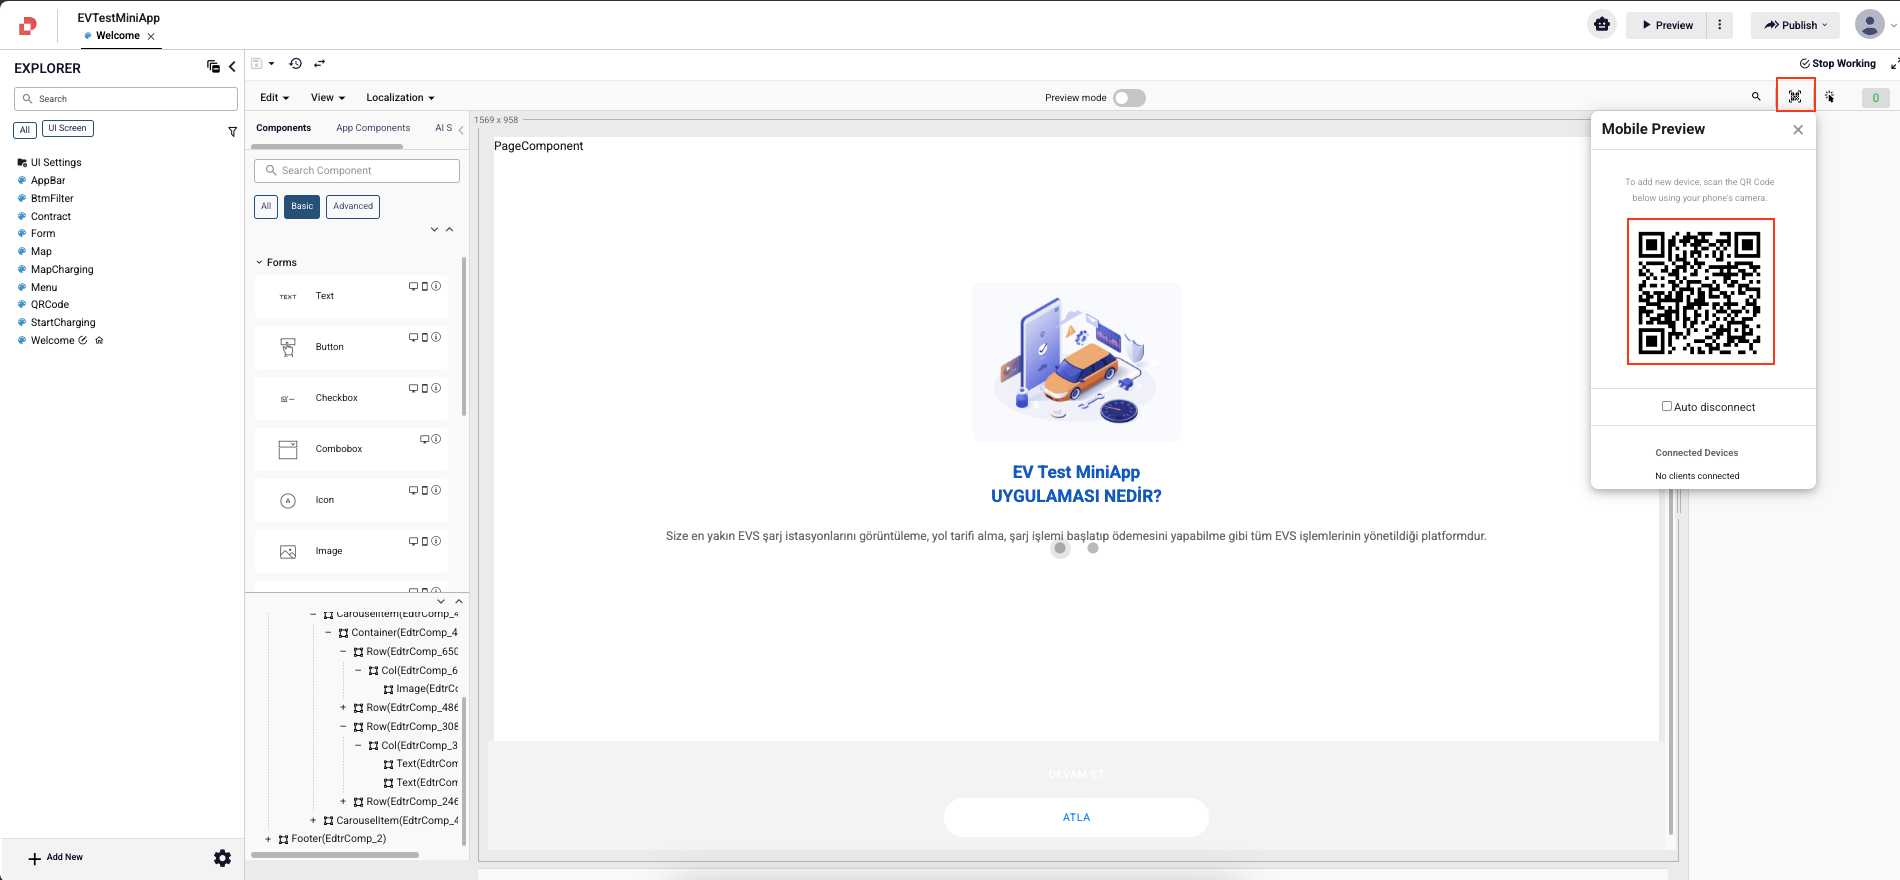
Preview Your MiniApp
Using the AppPreview QR code, you can test your application end-to-end on a mobile device, starting from the initial screen and applying any provided custom configurations if available. You can generate your AppPreview QR code by clicking the three dots next to the Preview button located at the top in Studio.
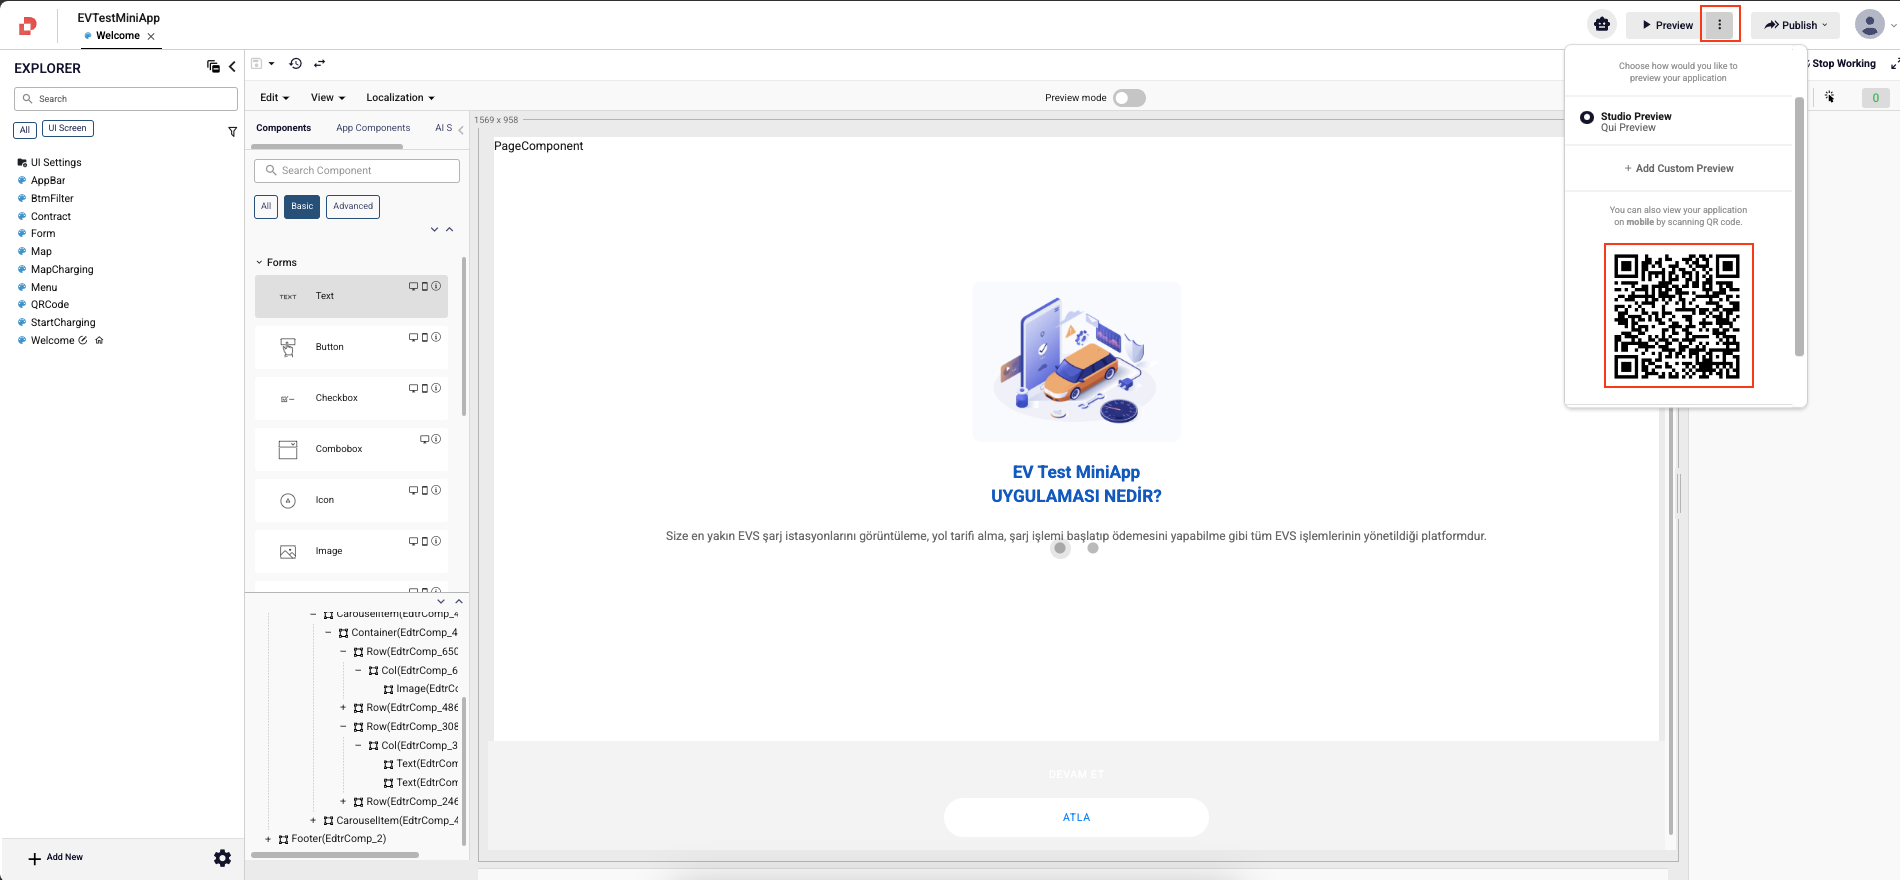
To use this QR code, the StudioApps application must be downloaded onto your mobile device from the App Store or the Play Store. Once the application is opened, tapping the MobilePreview section will launch a camera for scanning the QR code. By scanning the appPreview and pagePreview QR codes with this camera, the application will display the corresponding screens on your mobile device.
For more detailed information about the usage processes, please refer to this link.
Define Page Behaviours
Connect Pages: Establish connections between different pages of your application. Define navigation paths to enable transitions between screens. For more detailed information, click See More.
Defining Props and Events: Define props and events for the components to enable communication and interaction between them. Props allow you to pass data from parent components to child components, while events enable components to communicate changes or trigger actions.
Connecting Used Components: Connect the custom components you've created to build the desired user interface. Establish relationships between components to create a cohesive and functional UI design.
Service Integrations: To interact with backend services in UIs, call and manage HTTP requests in your page event or component events. For more detailed information, click See More.
Set / Get Data Storage: Use the store structure to transfer data between pages. For more detailed information, click See More.
Data Masking & Formatting: To ensure valid input, set Input Masking values for fields. Use Formatting to display data received from the service in a specific format on the front end. For more detailed information, click See More.
Validation: Ensure that the data entered by users into various input fields meets specific criteria or rules before it's submitted. For more detailed information, click See More.
Defining Global Methods: You can define methods either on a per-page basis or across the entire application for reuse.
Integration with Analytics Tools
SuperApp provides built-in support for analytics tools such as Dataroid and Google Analytics, enabling you to enhance customer interactions and deliver better experiences through data-driven insights. By integrating these tools into your MiniApp, you can collect and analyze user behavior, optimize user journeys, and make informed decisions to improve performance and engagement.
To use these integration options in your MiniApp, the host shell application where the MiniApp runs must also support the same analytics tools.
Integrating Dataroid in Your MiniApp
You can send metrics from your MiniApp to Dataroid by implementing Dataroid events. To learn how to add and use Dataroid events in your MiniApp, See Here.
Integrating Google Analytics in Your MiniApp
You can send metrics from your MiniApp to Google Analytics by using Google Analytics events. For detailed instructions on how to implement and use these events in your MiniApp, See Here.
Using Logging in Your MiniApp
To track the log messages you added to your MiniApp's screens, you must add a logHandler event to your pipeline file and make the necessary settings in the App Settings.
For detailed information about adding a pipeline file to your MiniApp and what needs to be done in App Settings, See Here.
Then, if you wish, you can send log messages to your own MiniApp backend with a network request using the messages variable defined in the logHandler.
For example, you can edit the logHandler event as follows to send log messages to your own MiniApp backend service:
declare var messages;

const req: IRequest = {
  url: "https://example.com/log",
  data: { messages },
  blockRender: false,
  http: "post",
  onFail: "logFail",
  onSuccess: "logSuccess",
  responseField: "respo"
};

quick.Request.async(req);
You cannot transfer the MiniApp package you created while logHandler is defined in your pipeline file to production, you can only use it in sub-environments (INT, UAT). For detailed information, See Here.
Using Certificate Pinning in Your MiniApp
To ensure secure execution of network requests within the shell application, MiniApps must implement certificate pinning for each backend endpoint they interact with.
In order to enable proper communication between your MiniApp and its backend services within the SuperApp environment, you are required to register the certificate information for each backend domain used by your application in Plateau Studio.
If the certificate information is not defined or incompletely defined, the MiniApp may fail to run in the shell application or may encounter runtime errors while making requests to specific services.
To avoid such issues and ensure a secure and stable integration:
- Navigate to App Settings > Certificates in Plateau Studio.
- Add all relevant certificate details (such as domain and certificate fingerprints) for each backend you communicate with.
Ensure the accuracy and completeness of the certificate information.
If certificate pinning is not properly configured, your MiniApp may not function as expected within the SuperApp, especially during network operations.
For more information on how to configure certificate pinning correctly, See Here.
Using the Consent
While Mini applications operate on the shell application, they have access to the user-specific information provided by the shell. This information enables user-specific operations to be performed within the MiniApp. To retrieve these details, you can review the structure required for accessing the parameters and information specified in the Consent table below. Examples of the code that should be written in the MiniApp screens to retrieve information from the shell are provided below. With this code structure, you will be able to access the special user-specific details supplied by the shell application in your MiniApp.
Within the logged-in area, you can use the returned information in your projects by triggering the relevant functions based on the user information you need.
| Function Name | Information | Key Word |
|---|---|---|
| GetIdentity | Name Surname Identification Number | .Name .Surname .TCKN |
| GetMailAddress | E-Mail Address | |
| GetPhoneNumber | Phone Number | .PhoneNumber |
| GetCustomerNumber | Customer Number | .CustomerNumber |
| GetCommercialCustomerNumber | Commercial Customer Number | .CommercialCustomerNumber |
| stopMiniApp | Stop the MiniApp | - |
| OpenMap | Opens the Device's Map Application | - |
In the Plateau Studio Editor, you can call quick.Quick.host.trigger from the Event tab for any component you are using.
The quick.Quick.host.trigger triggers the function in the shell project with the specified name. You can read the data returned by the function in the shell project as the response. These functions do not work in the development environment and must be run within the shell project for testing.
quick.Quick.host.trigger(functionName:string, params:{}): Promise<{isSuccess: boolean,retVal: any}>
Example Usage
async function CallConsent() {
    let param : any;
    quick.Quick.host.trigger("FunctionName", {}).then(response => {
        if(response.isSuccess === true) {
            param = response.retVal["funcRetVal"].Param;
        }
    }).catch(err => {
        quick.EM.trace("Error: " + err);
    });
};

CallConsent();
If you need to trigger multiple functions within the same event, you should call these functions nested, as shown below:
Multiple Call Consent Example Usage
async function CallMultipleConsent() {
    let param: any;
    let param2: any;
    quick.Quick.host.trigger("FunctionName", {}).then(response => {
        if(response.isSuccess === true) {
            param = response.retVal["funcRetVal"].Param;

            quick.Quick.host.trigger("FunctionName2", {}).then(response => {
                if(response.isSuccess === true) {
                    param2 = response.retVal["funcRetVal"].Param2;
                }
            }).catch(err => {
                quick.EM.trace("Error: " + err);
            });
        }
    }).catch(err => {
        quick.EM.trace("Error" + err);
    })
};
CallMultipleConsent();
Example Usage for GetIdentity Consent
The following code should be used to access the user's Name, Surname and Identification Number in the shell application.
async function CallGetIdentityConsent() {
    let name : any;
    let surname : any;
    let identityNumber : any;
    quick.Quick.host.trigger("GetIdentity", {}).then(response => {
        if(response.isSuccess === true) {
            name = response.retVal["funcRetVal"].Name;
            surname = response.retVal["funcRetVal"].Surname;
            identityNumber = response.retVal["funcRetVal"].TCKN;
        }
    }).catch(err => {
        quick.EM.trace("Error: " + err);
    })
};

CallGetIdentityConsent();
Example Usage for GetMailAddress Consent
The following code should be used to access the user's E-Mail Address in the shell application.
async function CallGetMailAddressConsent() {
    let mailAddress : any;
    quick.Quick.host.trigger("GetMailAddress", {}).then(response => {
        if(response.isSuccess === true) {
            mailAddress = response.retVal["funcRetVal"].Email;
        }
    }).catch(err => {
        quick.EM.trace("Error: " + err);
    })
};

CallGetMailAddressConsent();
Example Usage for GetPhoneNumber Consent
The following code should be used to access the user's Phone Number in the shell application.
async function CallGetPhoneNumberConsent() {
    let phoneNumber : any;
    quick.Quick.host.trigger("GetPhoneNumber", {}).then(response => {
        if(response.isSuccess === true) {
            phoneNumber = response.retVal["funcRetVal"].PhoneNumber;
        }
    }).catch(err => {
        quick.EM.trace("Error: " + err);
    })
};

CallGetPhoneNumberConsent();
Example Usage for GetCustomerNumber Consent
The following code should be used to access the user's Customer Number in the shell application.
async function CallGetCustomerNumberConsent() {
    let customerNumber : any;
    quick.Quick.host.trigger("GetCustomerNumber", {}).then(response => {
        if(response.isSuccess === true) {
            customerNumber = response.retVal["funcRetVal"].CustomerNumber;
        }
    }).catch(err => {
        quick.EM.trace("Error: " + err);
    })
};

CallGetCustomerNumberConsent();
Example Usage for GetCommercialCustomerNumber Consent
The following code should be used to access the user's Commercial Customer Number in the shell application.
async function CallGetCommercialCustomerNumberConsent() {
    let commercialCustomerNumber : any;
    quick.Quick.host.trigger("GetCommercialCustomerNumber", {}).then(response => {
        if(response.isSuccess === true) {
            commercialCustomerNumber = response.retVal["funcRetVal"].CommercialCustomerNumber;
        }
    }).catch(err => {
        quick.EM.trace("Error: " + err);
    })
};

CallGetCommercialCustomerNumberConsent();
Example Usage for OpenMap Consent
The following code should be used to open the device's map application with the desired location information in the MiniApp.
let lat : number; // Latitude information of the location to be opened
let lng : number; // Longitude information of the location to be opened
quick.Quick.host.trigger("OpenMap", {latitude: lat, longitude: lng});
Example Usage for stopMiniApp Consent
The following code should be used to Stop the MiniApp.
quick.Quick.host.trigger("stopMiniApp", {});
Using the Constant
The secure storage of secret values using the constant structure has been added in MiniApps. This allows sensitive information such as API keys, tokens, and similar data to be managed centrally, improving security and configuration management. See More
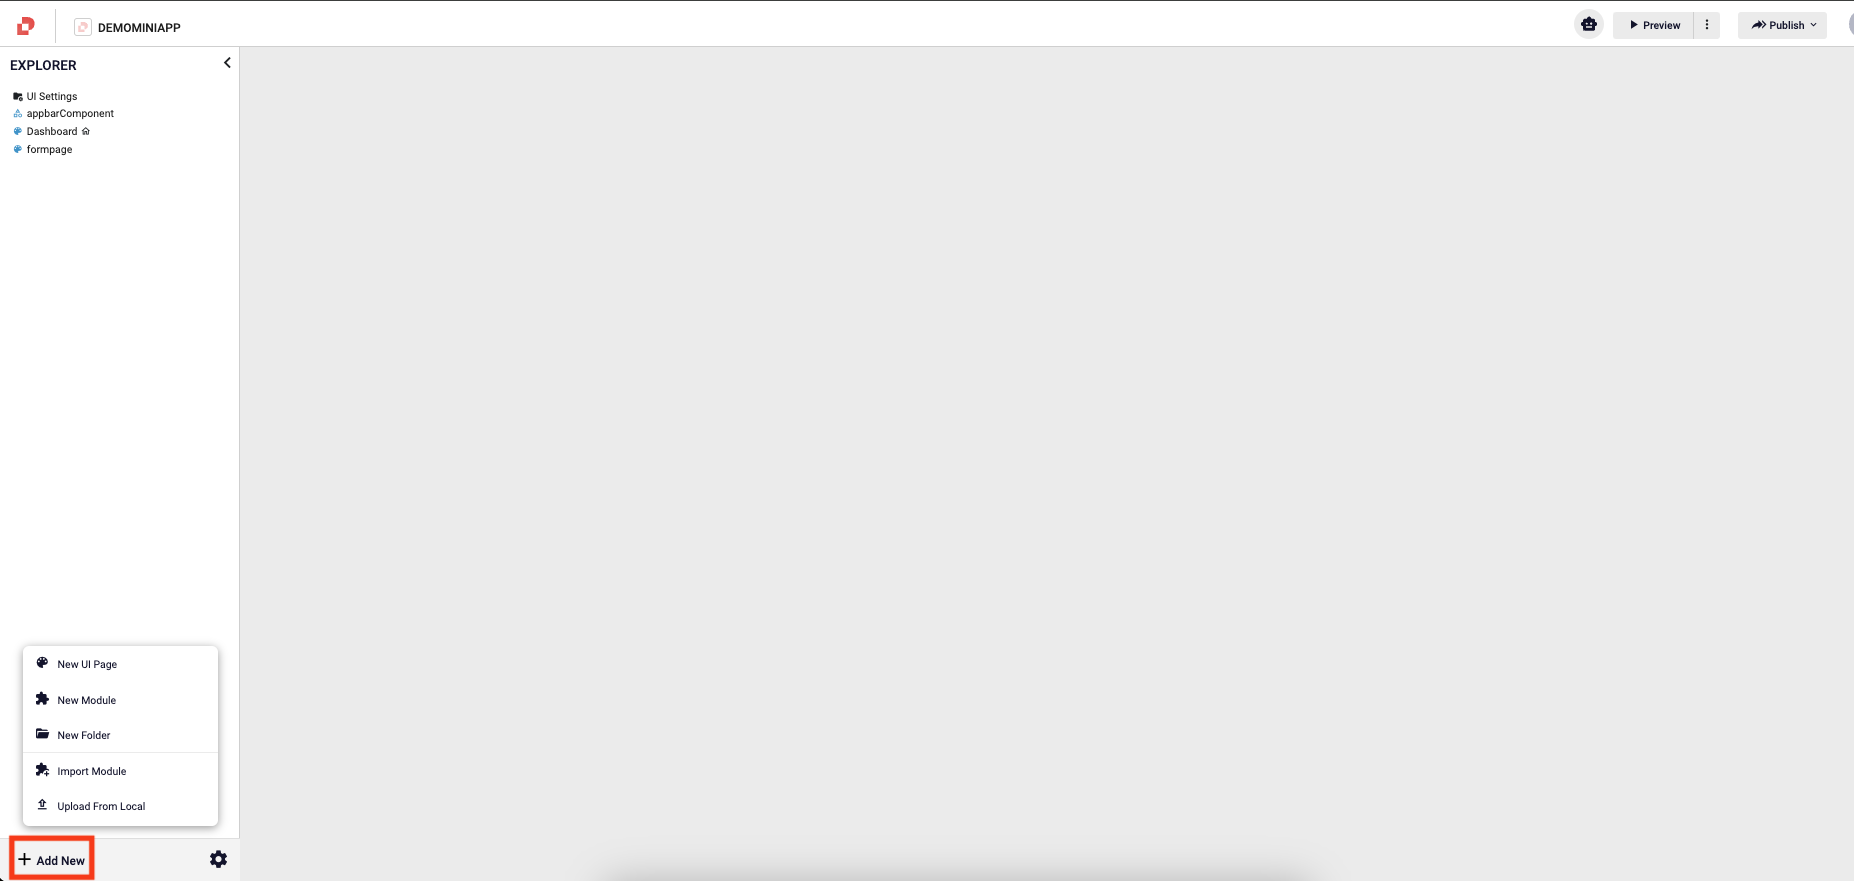
Step 1: Click the Add New button, then select New Constant and give the constant a name.
Step 2: If the Type is set to String the value works as a direct value.
Step 3: If the Type is set to Docker Environment Variable the added Value is retrieved from the portal.
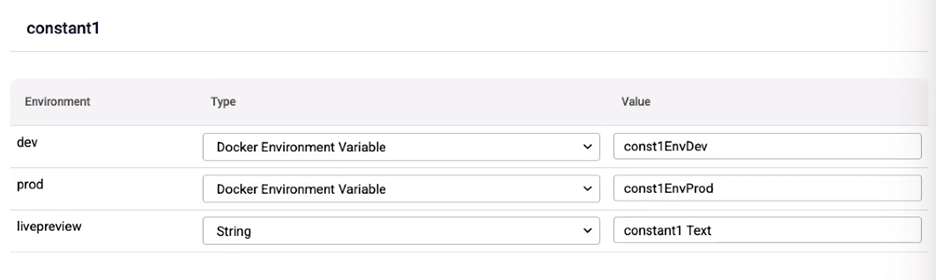
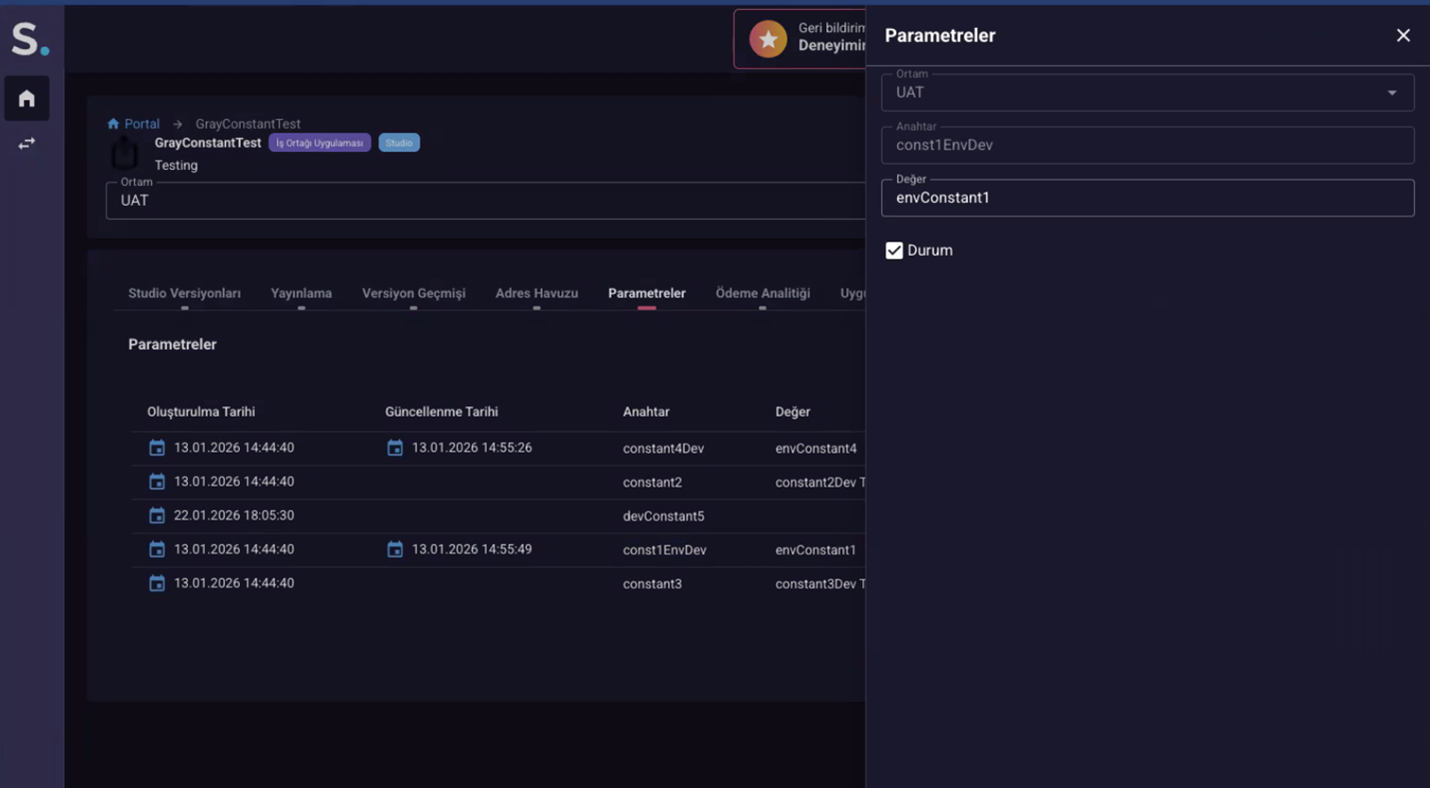
Step 4: Open the relevant MiniApp through the portal. Go to the MiniApp parameters page and select the appropriate environment.
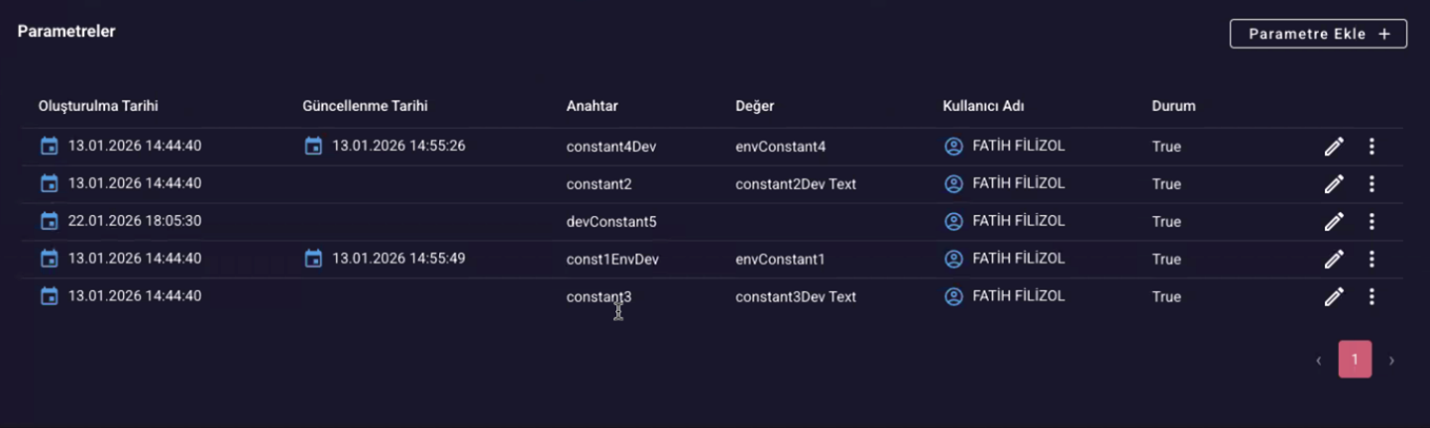
Step 5: In the next step, the value will be set as a key. The value provided by the key can be viewed in the values column. Click the pencil icon to define the corresponding value.
Using the Payment Component in MiniApps
To perform a payment transaction with your mini application, you can follow the steps outlined below:
- Step 1: To process a payment using MiniApp, you must first add the payment component—made available for your use in Studio—to your application. The steps required for this process are shown in the images below.
- Step 2: Next, you need to add the corresponding page to the payment page you have designed, where the payment transaction will take place. You can complete this addition using the section indicated in the image below.
- Step 3: Finally, to utilize the ready-made component that will execute the payment transaction, you should follow the steps specified below.
- The most crucial step in processing the payment is to include the miniappId information, which is expected as a parameter in the payment component.If you have already created your miniappId, you can refer here for more details. If you are creating your miniappId for the first time, you can follow the steps provided here.
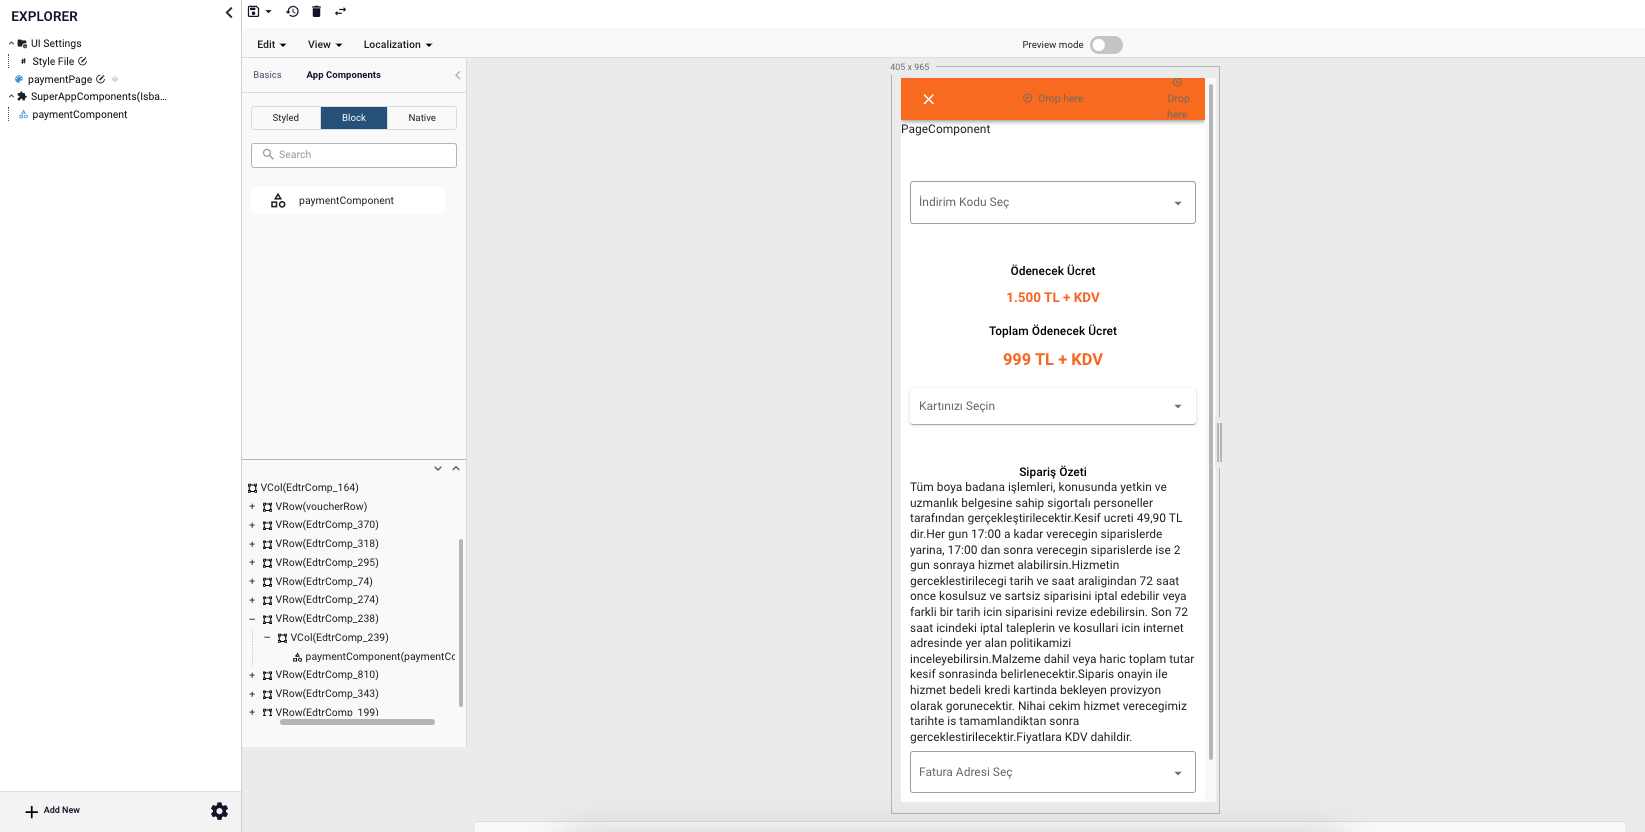
If the page contains a Payment Component, upload the Payment Component to the application by selecting Add New, then Import Module. This component should already be added to the organization group.

Manage MiniApp Versions
- The publishing process for a mini application developed in Studio proceeds in two steps. These steps are:
- Creating a packaged version of the application in Studio.
- Continuing the publishing process on SuperPortal by retrieving the packaged version of the MiniApp (integrated with Studio) and completing the necessary publishing steps.
- To manage your application versions, navigate to Settings.
- Under App Versions, you can check you Application List where you can create new version by clicking ADD NEW button or delete the unused packages by using the bin icon on the right.
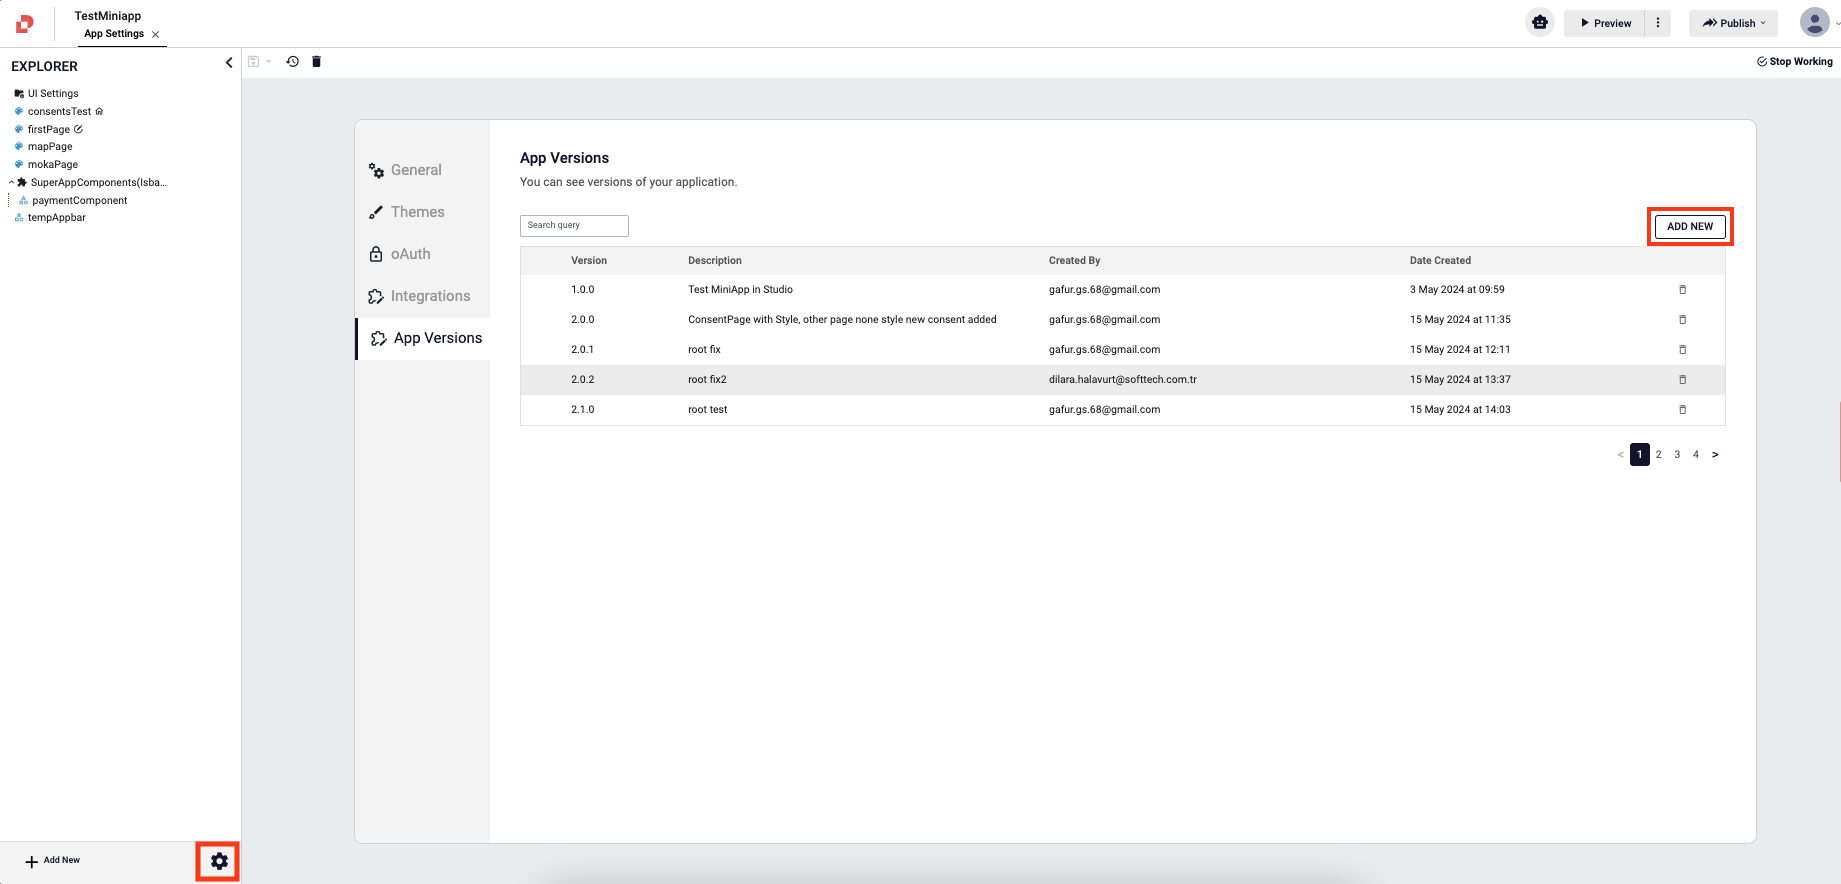
Versioning is the step for maintaining updates and ensuring consistency across different stages of your application's lifecycle.
Create Package
Detailed information regarding these steps is as follows:
- You can create a package for a mini application in Studio by following the steps outlined below.
- Once you complete these preparations that explanained above, navigate to Publish, then select Create Package to proceed.
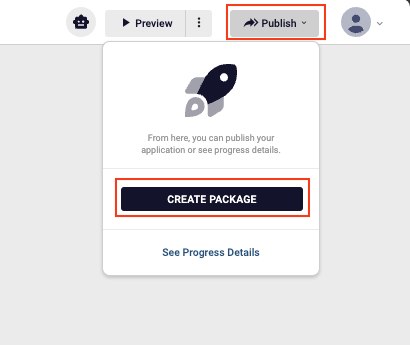
- In the panel that opens, click ADD NEW and create new version or select existing one/ones and click CREATE.
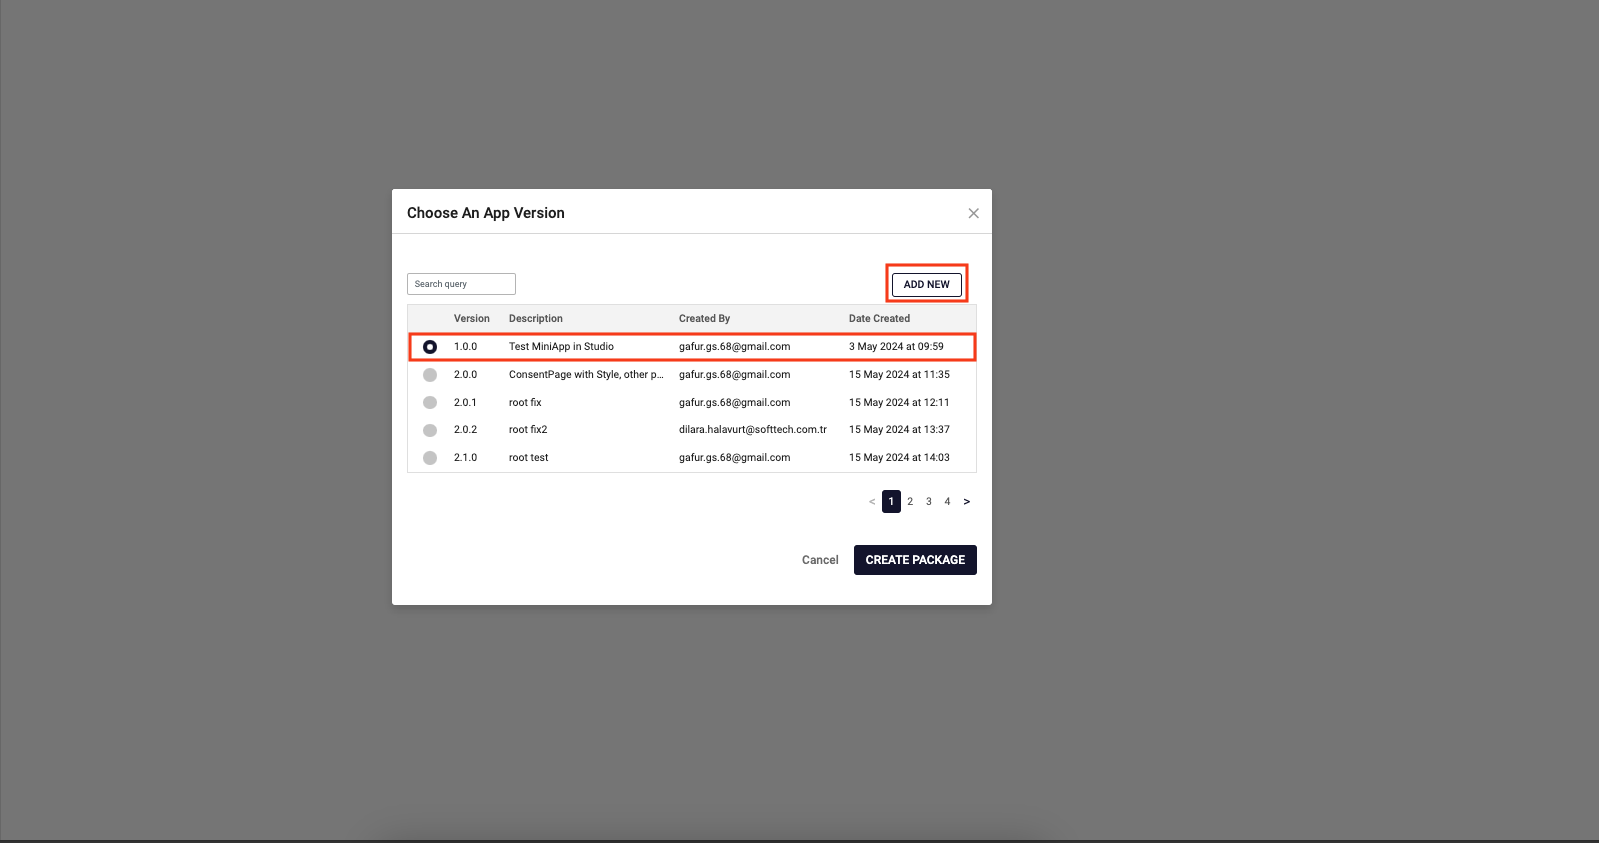
- Select the related package from the list, then click CREATE PACKAGE.
You can follow this process from Publish > See Progress Details.
After creating your package, you are ready to go to the SuperApp platform to intagrate your application by using the token generated in Plateau Studio.
To integrate your MiniApp to the SuperApp Portal, you need to enter the token generated via Plateau Studio once per application.
To learn how to generate and use your token for your MiniApp integration, go to the Token Integration section below.
Token Integration
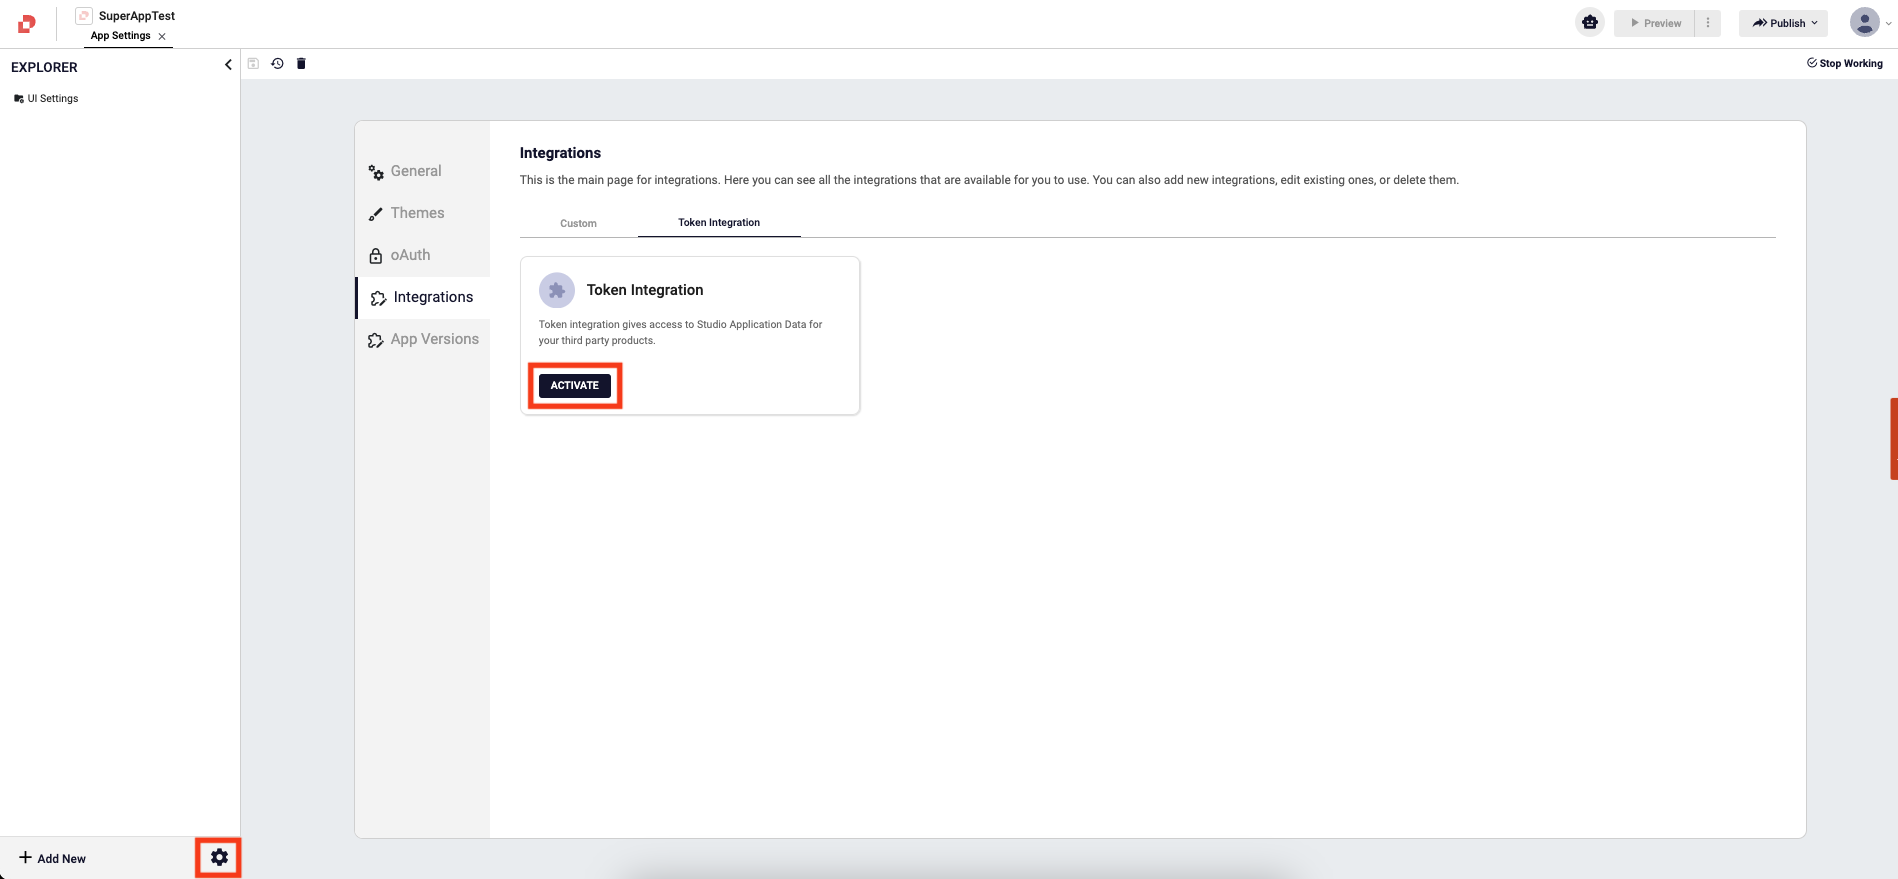
To securely publish your application to the SuperApp platform, you need to acquire a token. Tokens authenticate your application and ensure secure communication between Plateau Studio and the SuperApp Portal.
How to Generate a Token
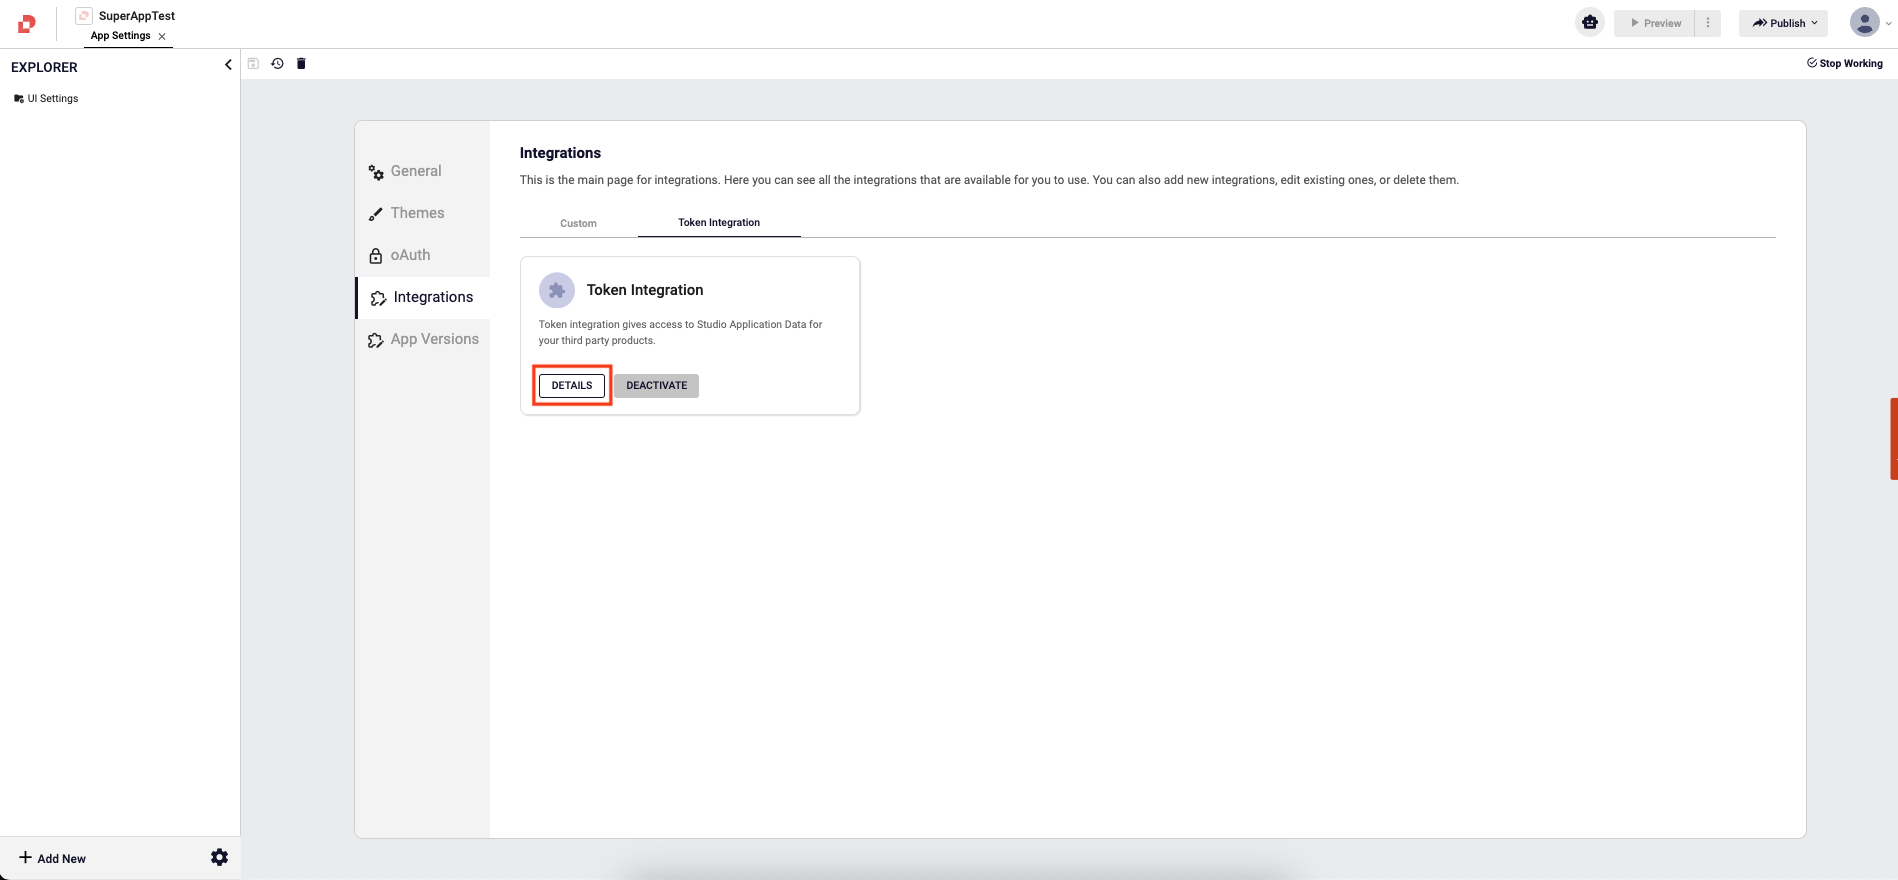
- Go to App Settings and navigate to Integrations tab.
- To generate a token click Activate.
- After generating your token in Plateau Studio, copy and save the generated token to use it when adding your MiniApp to SuperApp Portal. To proceed your integration, go to SuperApp Portal and login.
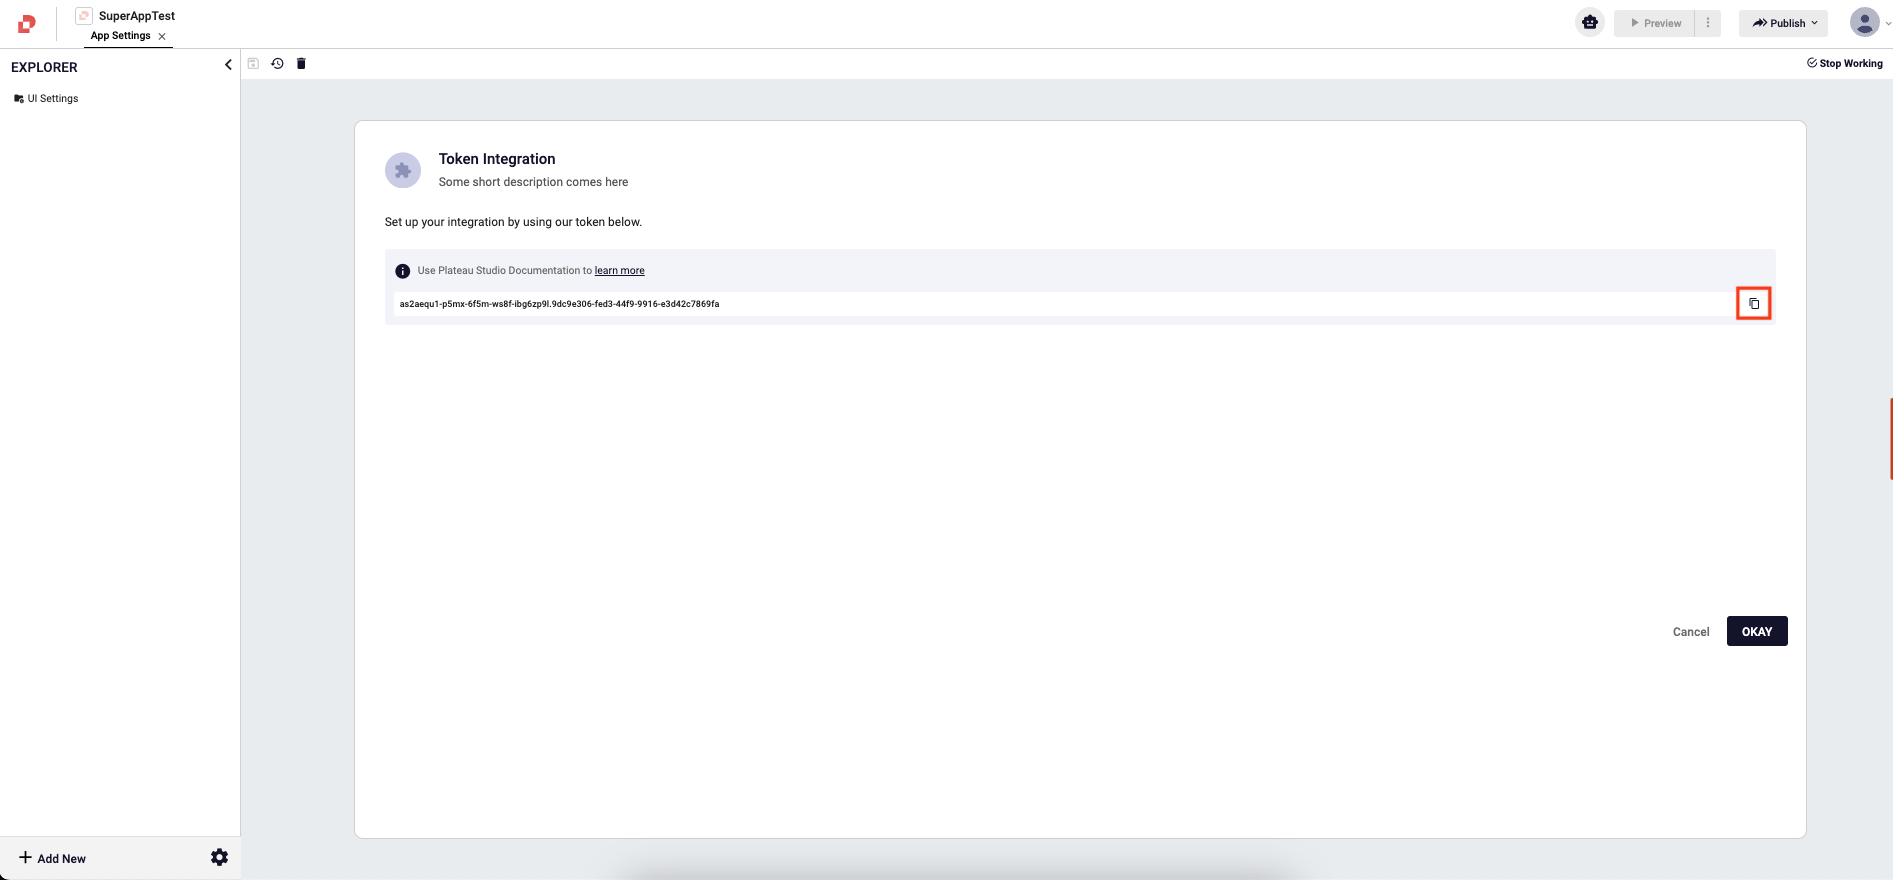
Clicking DETAILS button allows you to re-access to your generated token.
To connect a packaged MiniApp from Studio to the SuperApp Portal, follow the steps outlined below.
- Paste the copied token into the Studio Token and click the Get MiniApp Information button.
If successful, the application name created in Plateau Studio should appear in the Mini Application Name section.
- Provide the necessary details and upload your MiniApp logo and Analysis Document for MiniApp creation in the Portal and complete the process.
MiniApp logo only affects your SuperApp Portal image and you can upload any PDF document for the analysis document.
Next, you should expect the package information created in Plateau Studio to appear in the Version List button of the transferred MiniApp in the Portal.
From the available versions, select the desired one and click the Get Studio Version button.
After this step, the MiniApp is sent for approval in UAT. Once approved, it is published. For production deployment, you should use the SuperApp Promotion process.
Release Your MiniApp
For the steps required in the publishing process of a MiniApp integrated between Studio and SuperApp Portal, please follow the steps specified in this link.