Datatype Editor
The Datatype Model Editor is an editor that allows users to create a complex data type composed of multiple primitive or other complex data types. Datatype models can be used in many places within workflows to represent a data type. A workflow's data instance object is also a datatype model. When the model is selected as a data instance, the Datatype Editor also allows editing the Summary field used throughout the process. By enabling the persistence feature on datatype models, the object gains the ability to be stored in the database. With the Datatype Editor, database queries for persistence-enabled objects can also be managed in the Entity tab.
Example Usage Scenarios
- Creating a data type for a data instance maintained on a workflow
- Creating a data type to be saved to the database
- Creating a data type to be used in functions within the process
Editor Layout
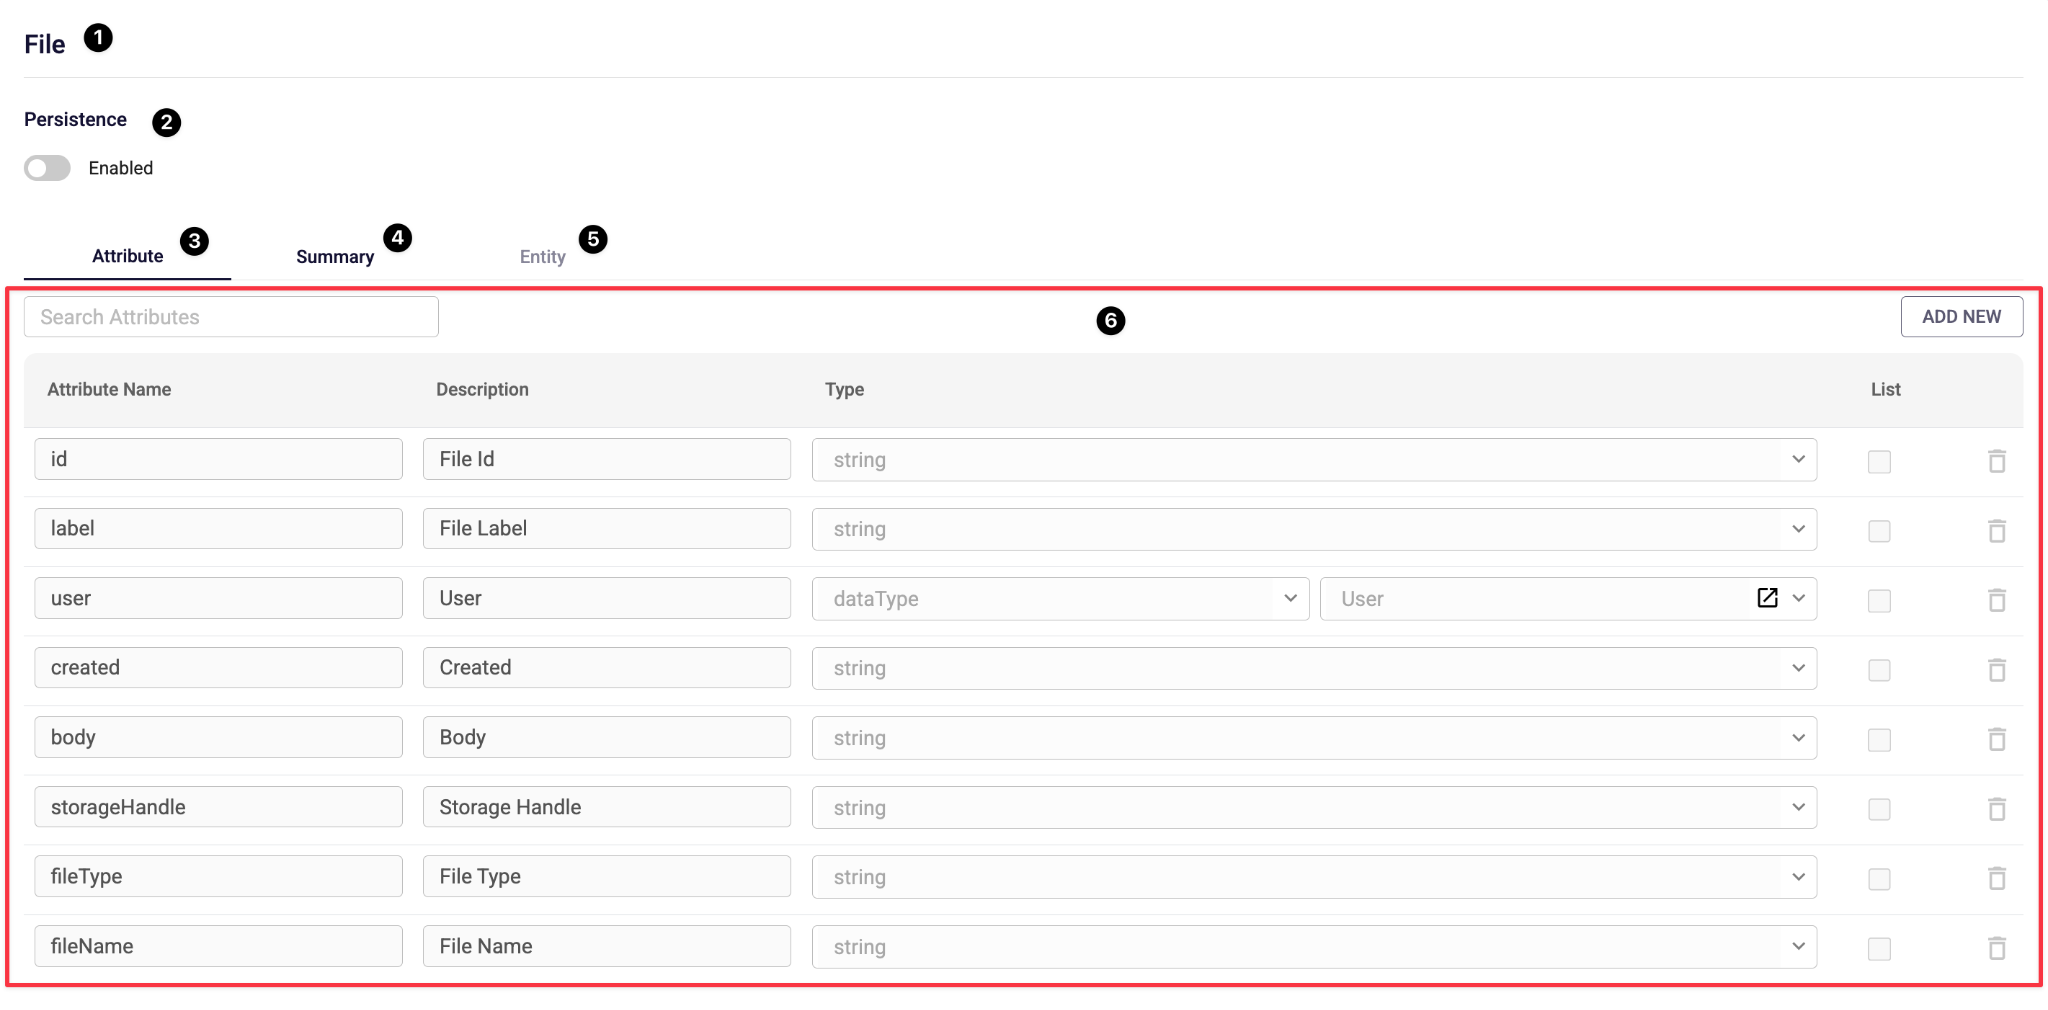
Model Name (1): This section displays the name of the data type model.
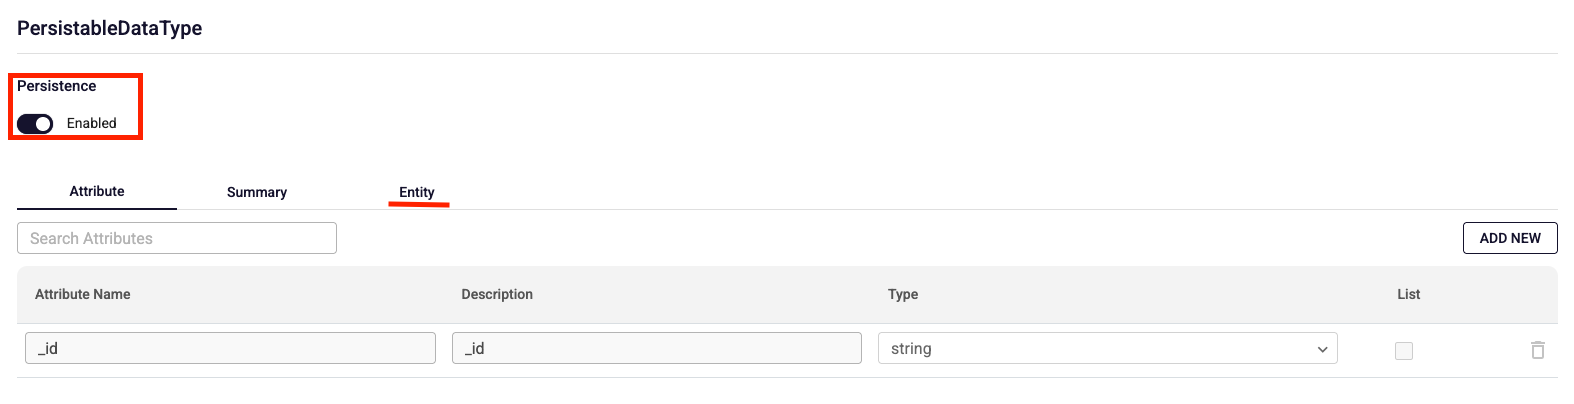
Persistence Status (2): The section where you select whether the data type will be storable in the database. When Enabled is selected, the data type model becomes storable in the database, and the Entity (5) area which allows managing database queries becomes active.
Attribute Tab (3): The button that opens the attribute page where data type attributes are displayed, new attributes can be added, and existing attributes can be edited or deleted.
Summary Tab (4): The button that opens the page where you can determine which attributes of the data type will be stored in the summary section the part kept as a summary in the workflow's context throughout the workflow for a datatype used as a data instance by a workflow.
Entity Tab (5): The button that opens the page where database queries for the data type to be stored in the database are managed. It becomes active when persistence is enabled; otherwise, it is not clickable.
Attribute Page
The Attribute Page is where the data type's attributes are managed. Users can:
- Create a new attribute
- Edit or delete existing attributes
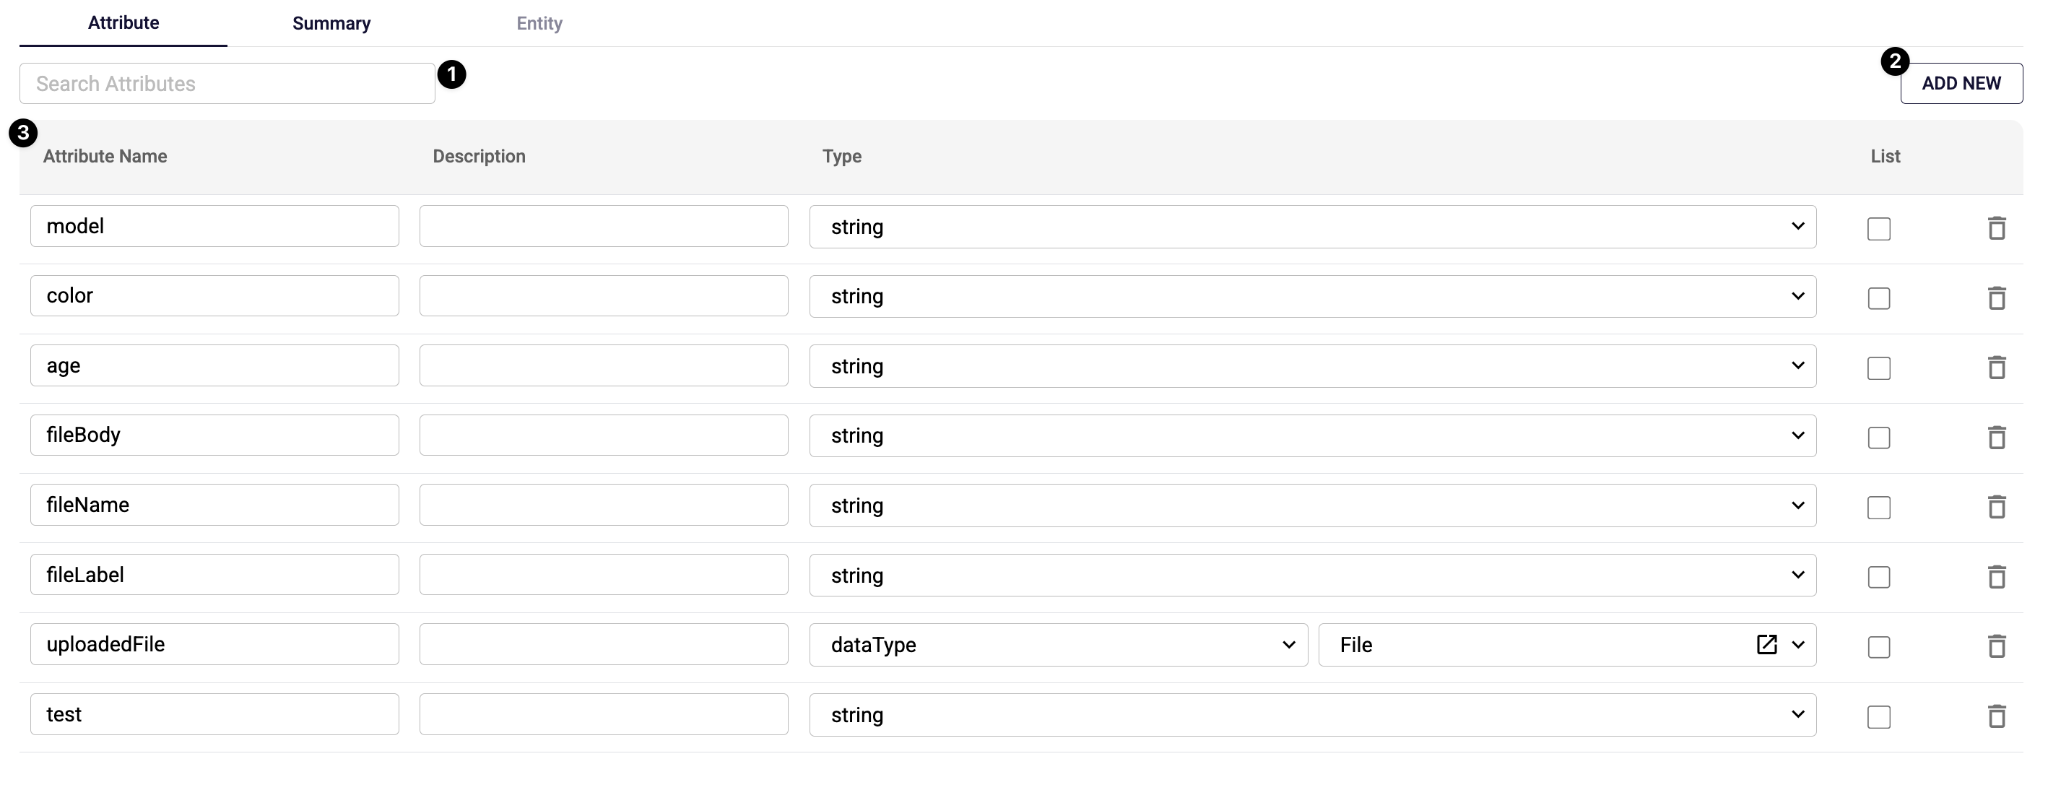
Attribute Search Bar (1): The section where attributes listed in the table (3) can be quickly filtered by name.
Add New Button (2): Adds a new empty attribute to the table.
Attribute Table (3): The area where the attributes belonging to the data type are listed. It consists of 4 main columns:
- Attribute Name: The name of the attribute.
- Description: The description of the attribute. Used for easier understanding by users.
- Type: The data type of the attribute. It can be primitive types such as String, Number, or DateTime. Additionally, by selecting dataType, a different data type model can be referenced, allowing a complex data type to be held within another data type.
- List Checkbox: Allows selecting whether the data will be a list type or a single object.
- Trash Icon: Deletes the corresponding attribute.
Summary Page
The Summary Page is where you can select and manage which attributes of the datatype's data instance will be stored in the summary field within the workflow's context while the relevant workflow is running if the data type model is selected as a workflow's data instance. The usage of summary data can be shaped according to user needs.
Summary data is stored within formContext → summary in the workflow context. For more detailed information on this topic, you can refer to the Workflow Context page.
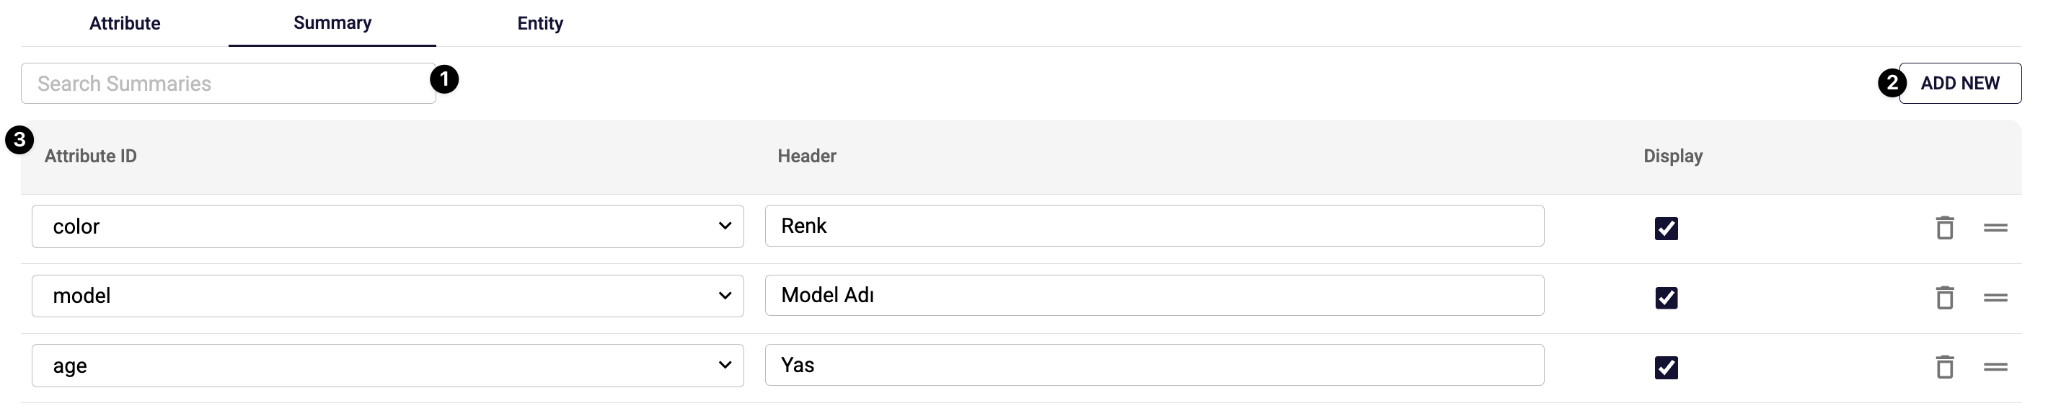
Summary Search Bar (1): The section where attributes listed in the table (3) can be quickly filtered by name.
Add New Button (2): Adds a new empty attribute to the summary table (3).
Summary Table (3): The area where the attributes selected to be included in the datatype's summary are listed.
- Attribute ID: The name of the attribute to be added to the summary.
- Header: The field describing the attribute in the summary.
- Display: The setting for whether it will be visible in the UI even though it exists in the summary.
- Trash Icon: Removes the corresponding attribute from the summary table.
- Move Icon: The button to move the corresponding attribute up or down and change its order.
Entity Page
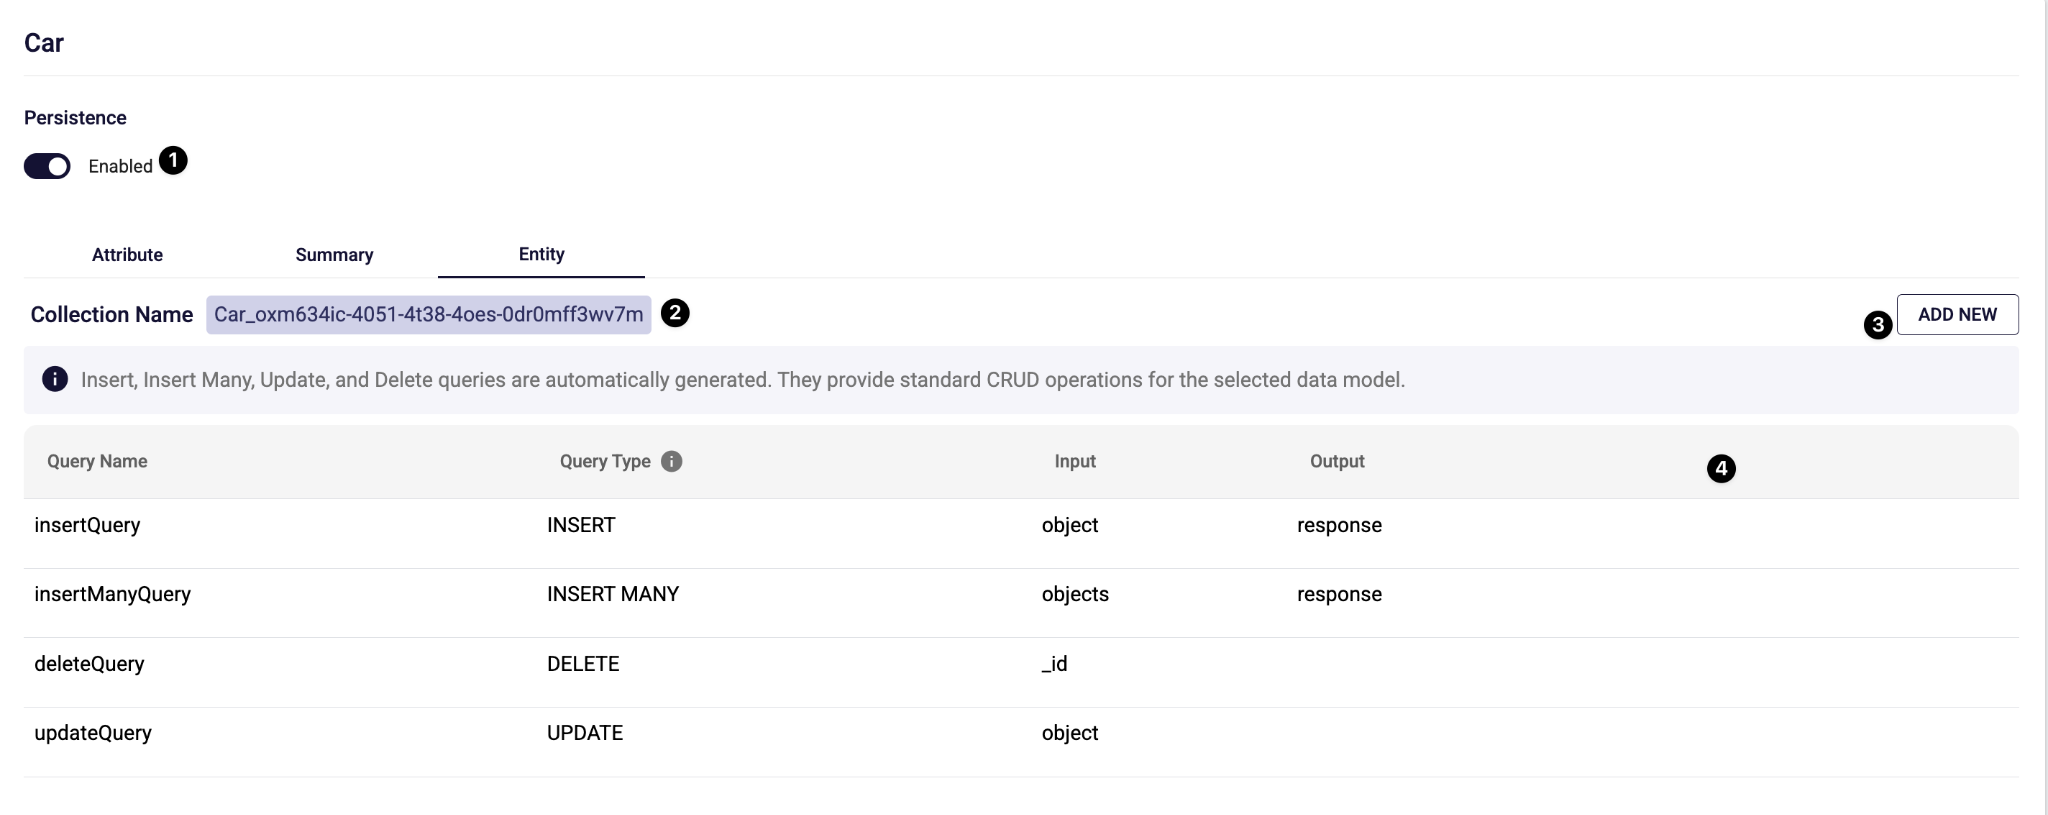
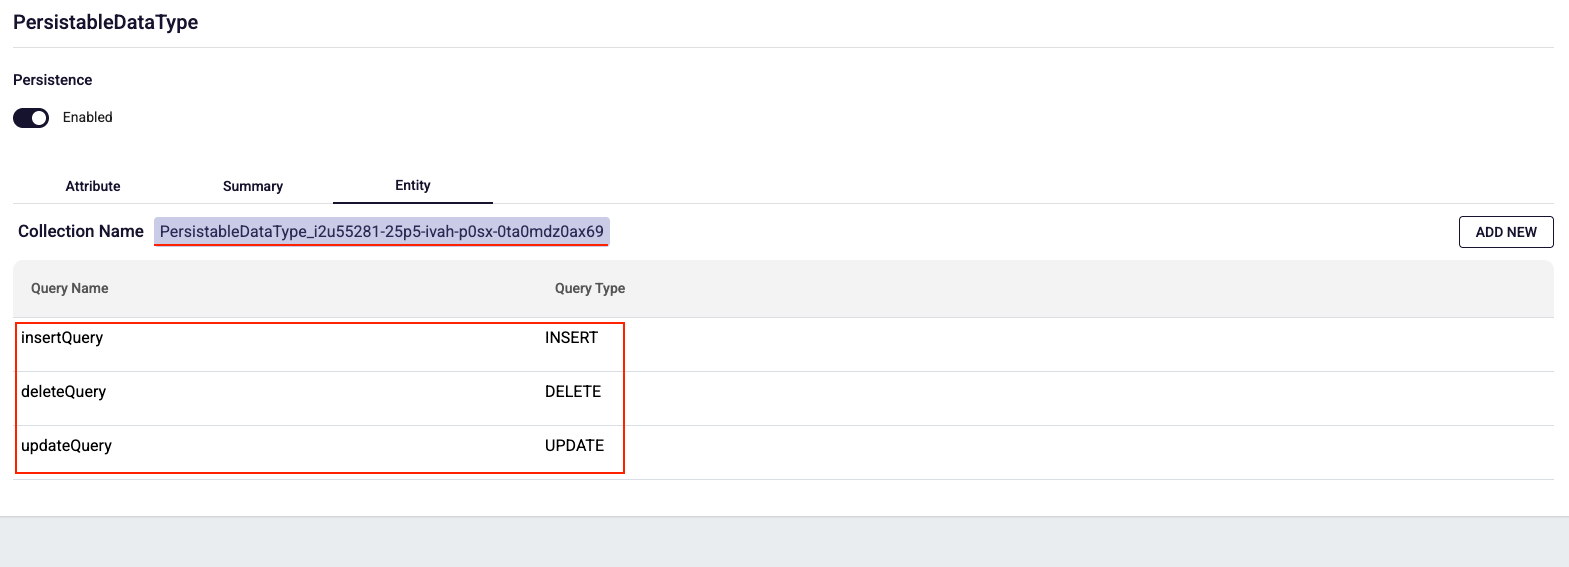
The Entity Page is active when persistence is enabled for the data type, and it is the page where database queries for the data type which will now be stored in the database can be managed. Here, users can:
- View the database collection name belonging to the data type
- View existing database queries
- Navigate to the page where they can add new database queries
Persistence Status (1): The section where you select whether the data type will be storable in the database. When Enabled is selected, the data type model becomes storable in the database, and the Entity page becomes active. Additionally, an id attribute is automatically added to the data type.
Collection Name (2): Information about which collection the data type is stored in within the database.
Add New Button (3): The button that navigates to the page for adding a new database query.
Database Queries Table (4): The table listing the callable database queries belonging to the data type. It consists of 4 main columns:
- Query Name: The name of the database query.
- Query Type: The type of the database query (INSERT, INSERT MANY, DELETE, UPDATE, SELECT, COUNT).
- Input: The input of the database query.
- Output: The output of the database query.
New Database Query Creation Page
This page is the editor where the behavior of the database query to be executed on the collection associated with the data type is defined. Here, users can:
- Specify the query type (Select / Count) and name
- Configure whether a Select query returns a single or multiple results
- Create conditions (WHERE logic) using filter rules and rule groups
- Select the returned fields (projection) and, if applicable, aggregate functions
- Define additional options such as sorting (sort) and pagination (limit/skip)
- Define the values the query will take as input and the expected output from the right panel, so that input is provided accordingly and output is used accordingly in the DBEntity workflow function step that will call the database query
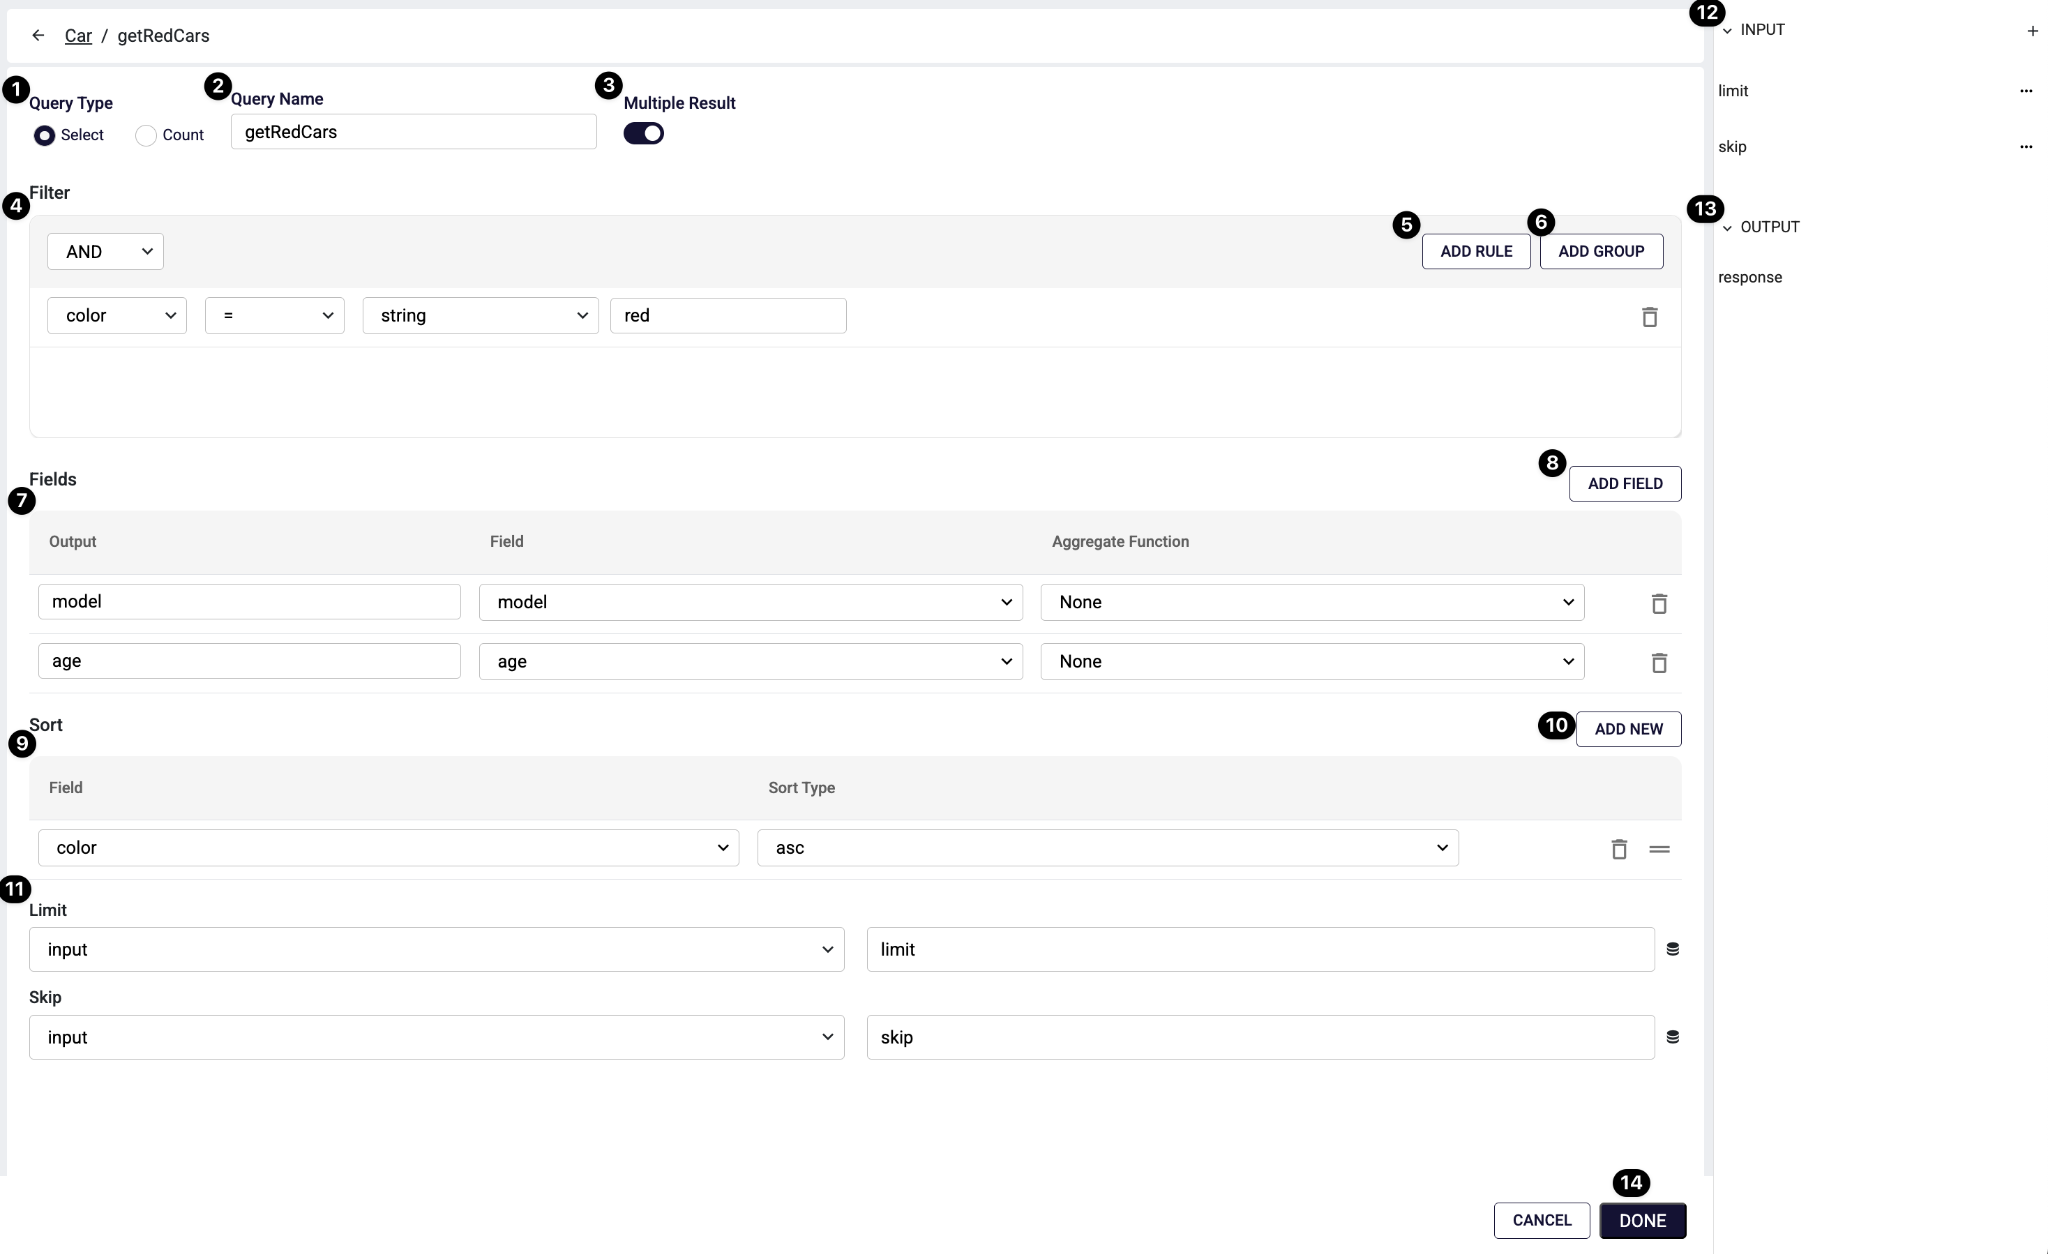
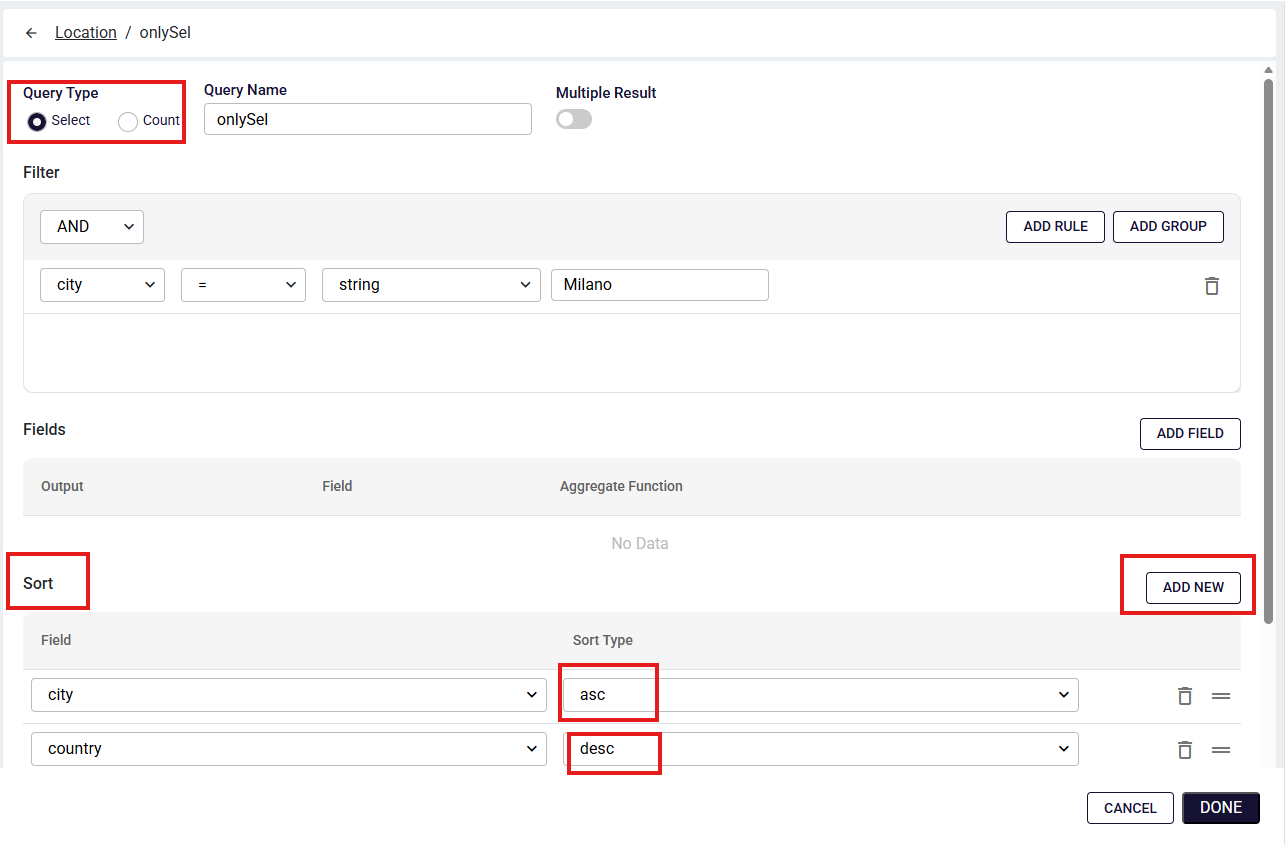
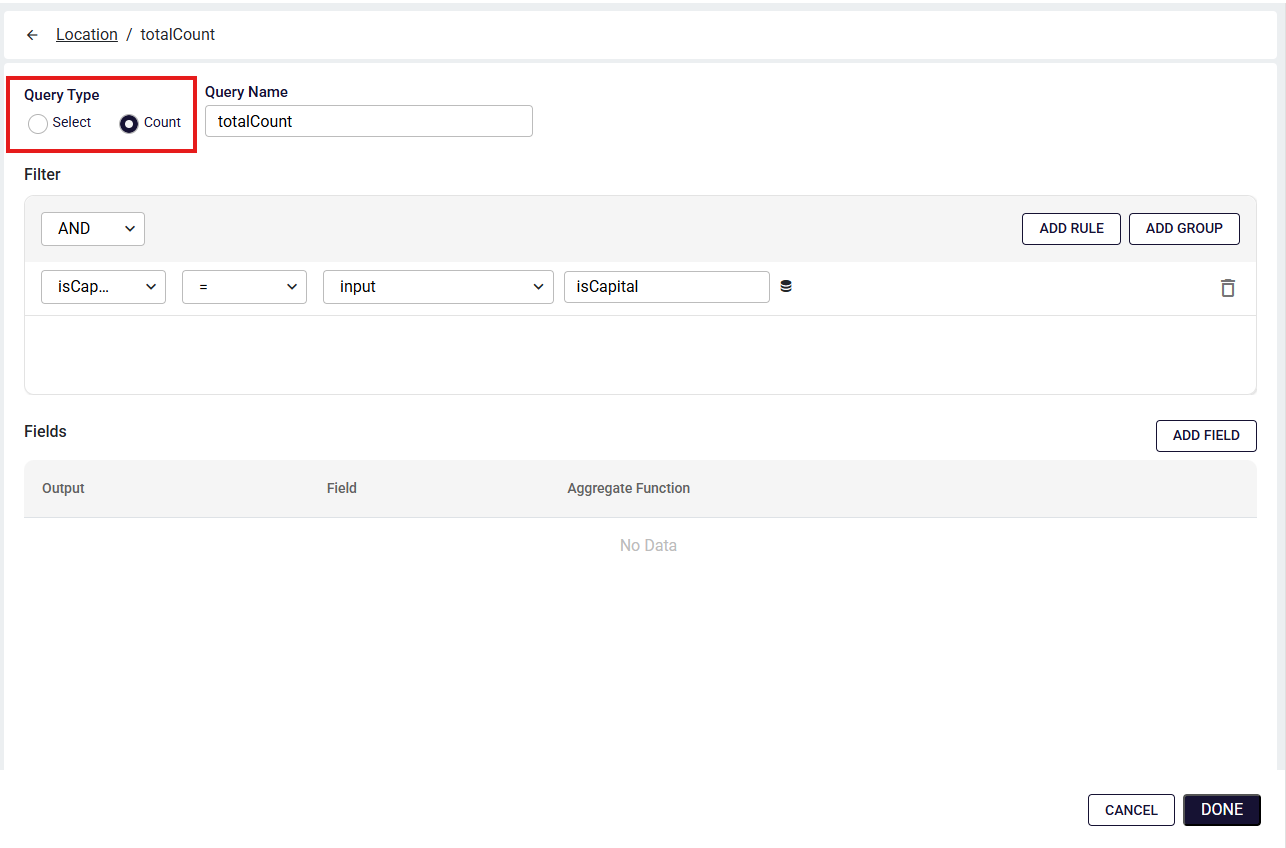
Query Type (1): The field where the query type is selected.
- SELECT: Returns record(s)
- COUNT: Returns the number of records matching the condition
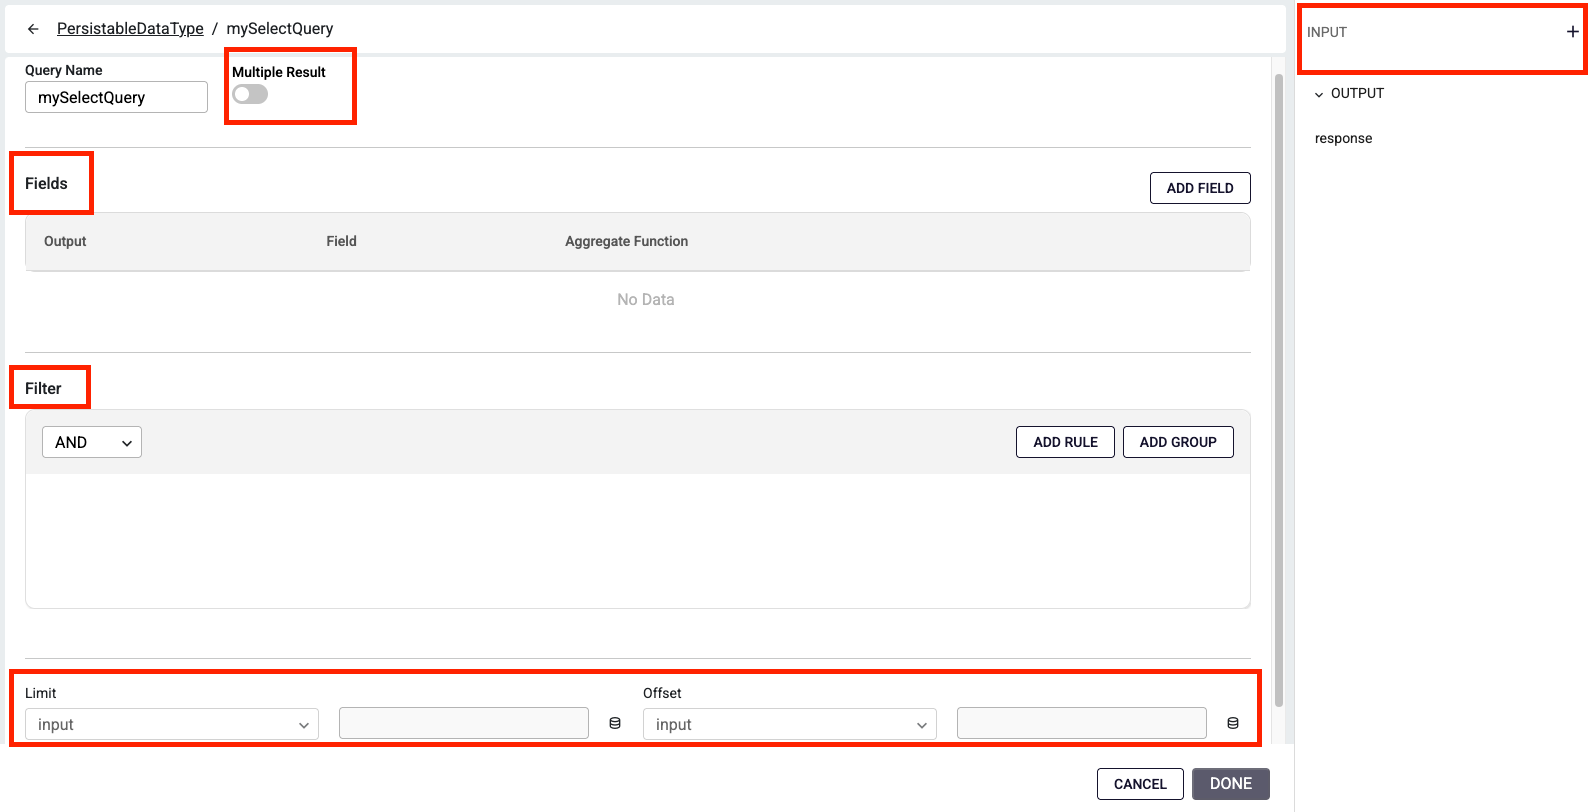
Query Name (2): The name of the query.
Multiple Result (3): Determines whether the query result will be a list (array) or a single record.
- When enabled: multiple records can be returned
- When disabled: a single record is expected to be returned
Note: Since Count queries always return a single record, the Multiple Result field is not present.
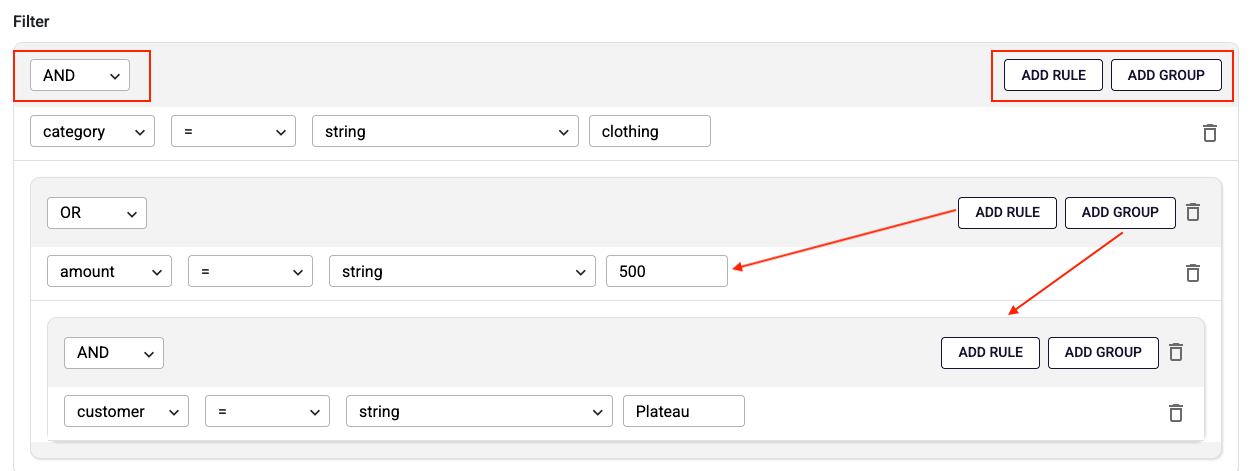
Filter (4): The section where conditions to be applied to the query are defined. Here, each rule typically consists of the following parts:
- Field selection
- Operator (=, !=, >, <)
- Type (string, literal, input, constant)
- Value
The AND/OR selection at the top determines how rules at the same level are connected to each other.
Add Rule (5): Adds a new condition (rule) to the current filter group.
Add Group (6): Creates a parenthesized/nested group within the filter. Used for complex logic such as: (A AND B) OR (C AND (D OR E)).
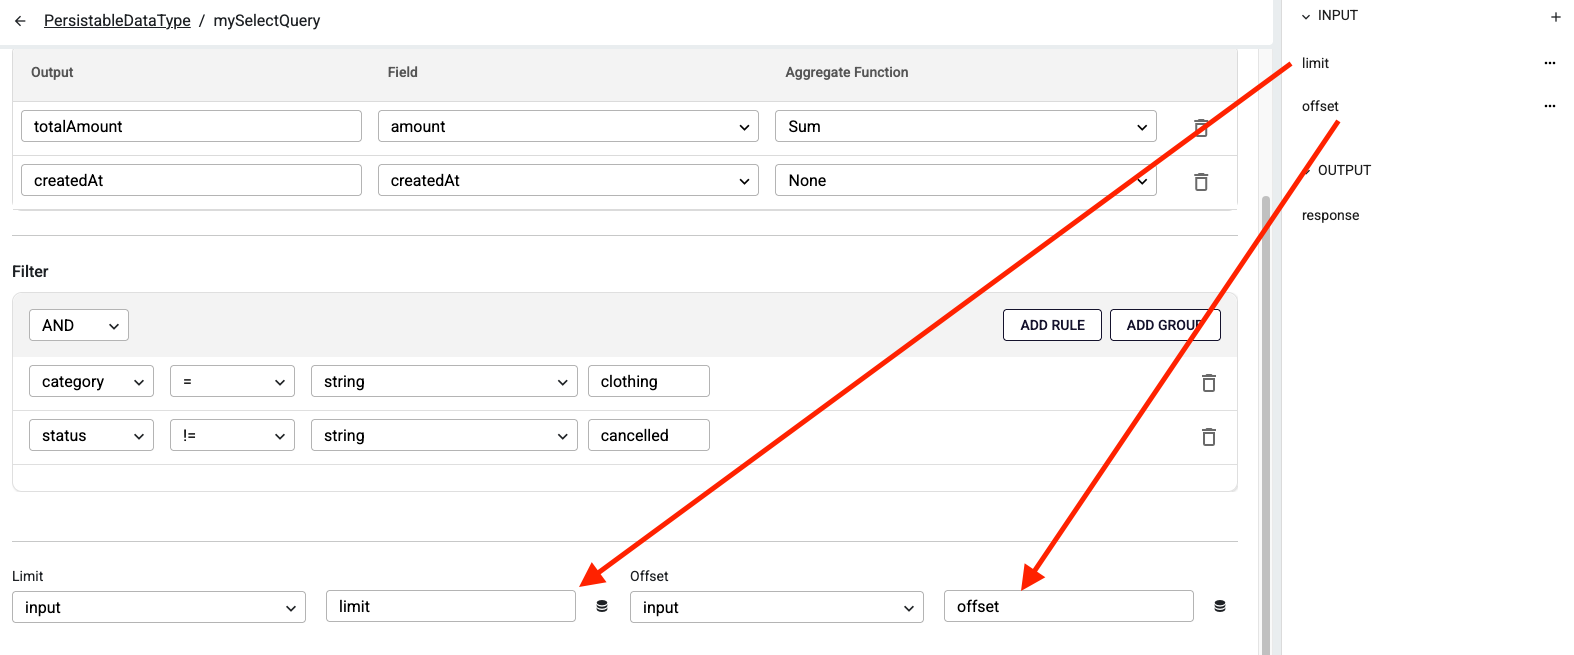
Fields (7): The section where the fields to be returned as results in queries are selected.
- Output: The field name to be returned externally (response field)
- Field: Which field on the entity it will be read from
- Aggregate Function: The aggregation function to be applied if necessary (None, Min, Max)
Add Field (8): Adds a new field row to be returned in the response.
Sort (9): Determines which field and in which direction the Select query results will be sorted.
Add New (10): Adds a new sort rule. Multiple sort rules can be defined.
Limit / Skip (11): Used for pagination of Select query results:
- Limit: How many records will be returned
- Skip: How many records from the beginning will be skipped (offset)
These fields are generally linked with query input parameters (mapped to limit and skip inputs as shown in the example).
Input (12): The area where the input parameters that the query will receive from outside are listed (e.g., limit, skip). The parameters here can be used in filters, limit/skip fields, or other dynamic locations.
Output (13): Shows the output contract that the query will return externally (e.g., response). For Select queries, this response is typically shaped according to the Fields you selected; for Count queries, it is expected to return a value in the format {totalCount: x}.
Done Button (14): Saves the query.
Running Datatype Database Queries
Database queries are used with the Data Entity component within the Workflow Function Editor. For more information on this topic, please refer to the Data Entity page.
FAQ
How to create a Persistable DataType?
After you create a Data Type and enable Persistence, you can navigate to the Entity tab.
Under the Entity tab, insert, delete, and update queries are automatically generated and cannot be edited. An unchangeable collection name is also created for the corresponding database operations.
To create a select query, click the Add New button.
How to add new attributes?
In the Attribute tab, you can add new attributes and define their description and type. The attributes you add can then be used in the Entity tab.
How to create a select query?
When creating a new select query, you must provide a Query Name and at least one of the following: Fields or Filter. If you don't provide the required information, the Done button remains inactive and the query cannot be saved.
How to use Field Table?
Within a Field column, you can select one of the attributes created in the Attribute tab and apply an appropriate aggregate function.
Sum and Avg can be applied only to data types: number and any.
Min and Max can be applied to data types: number, string, datetime, boolean, and any.
If you select None, no aggregate function is applied, and the field is included in the output as-is.
In the Fields table, you can also define the Output Name, which specifies the alias for the returned value.

How to use Filter Table?
In the Filter section, you can create rules to restrict the returned data. These rules can be combined using logical operators such as AND or OR, allowing you to include only the attributes that match the defined conditions.
When creating a filter, you can define groups of rules. Each group is connected by a logical operator (AND or OR) that applies to all rules and sub-groups within it.
For example, the filter shown in the image would be represented as:
(category = "clothing") AND (amount = "500" OR (customer = "Plateau"))
In rule area:
- On the left, you select the attribute from the data.
- On the right, you provide the value to compare against.
- The operator defines how the comparison is made and can be one of the following:"=", "!=", "<", ">", "<=", ">=", "contains", "begins with", "ends with", "does not contain", "does not begin with", "does not end with", "is null", "is not null", "in", "not in", "between", "not between".
How to use Multiple Result - Limit and Offset?
When you enable the Multiple Result switch, the Limit and Offset fields become available at the bottom of the page. These fields are optional and can be used to restrict the number of results or to support pagination in API requests.
Note: These fields can only be modified through input values, and only when Multiple Result is enabled.
How to use Sort?
In the Sort section, you can select the column to be sorted and specify the sort order (ASC or DESC).
How to create a Count query?
A count query can be created by selecting the query type as Count. A count query returns the total number of records produced by the executed query.
How to add Database Entity in function?
Within a Flow model, you can add a DBEntity step to interact with a persistable data type.
Select the previously created persistable Data Type model as the DB Entity Model.
Below that, choose the query you want to execute.
Based on this selection, the required inputs for the query will change. You can configure these inputs in the IN VARIABLES MAPPING section.
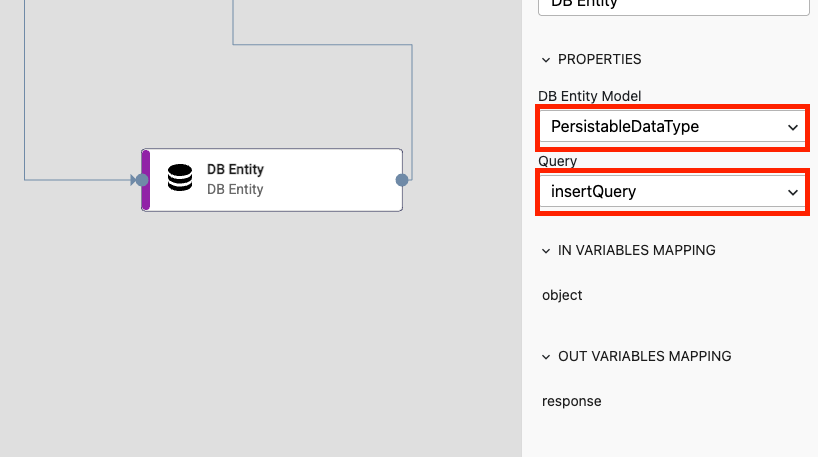
How to use Insert Query?
An Insert query takes an input of type object.
- A new _id is generated to write the object into the database.
- If the object already contains an _id field, it is overridden.
- If not, a new _id is added automatically.
The response of the query is the generated _id of the object, returned as a string.
How to use Delete Query?
A Delete query requires only the _id of the object.
- The record matching this _id is removed from the database.
- The response returns an empty object: {}.
How to use Update Query?
An Update query takes an input of type object, which must include an _id field.
- The record is located based on the provided _id.
- The record is updated with the new values from the object.
- The response returns an empty object: {}.
How to use Select Query?
In a Select query, you can view the inputs defined during query creation.
- There are no default inputs; only the ones you added based on your requirements are available.
- The response is returned as an array.
- If Multiple Result is not enabled, the array contains only a single element.
How to use Insert Many Query?
It inserts an array of objects in the input's 'objects' field.
- A new _id is generated to write the object into the database.
- If the single object in object array already contains an _id field, it is overridden.
- If not, a new _id is added automatically.
References
DB Entity