REST Service Editor
Users can make REST requests during a process by using the Rest Service component within a workflow function. The REST service request that can be selected to be sent through this component is designed via the REST Service Editor.
Example Usage Scenarios
- Making a request to another service within the same namespace inside a workflow
- Making a request to a mail service after a user task within a workflow
Editor Layout
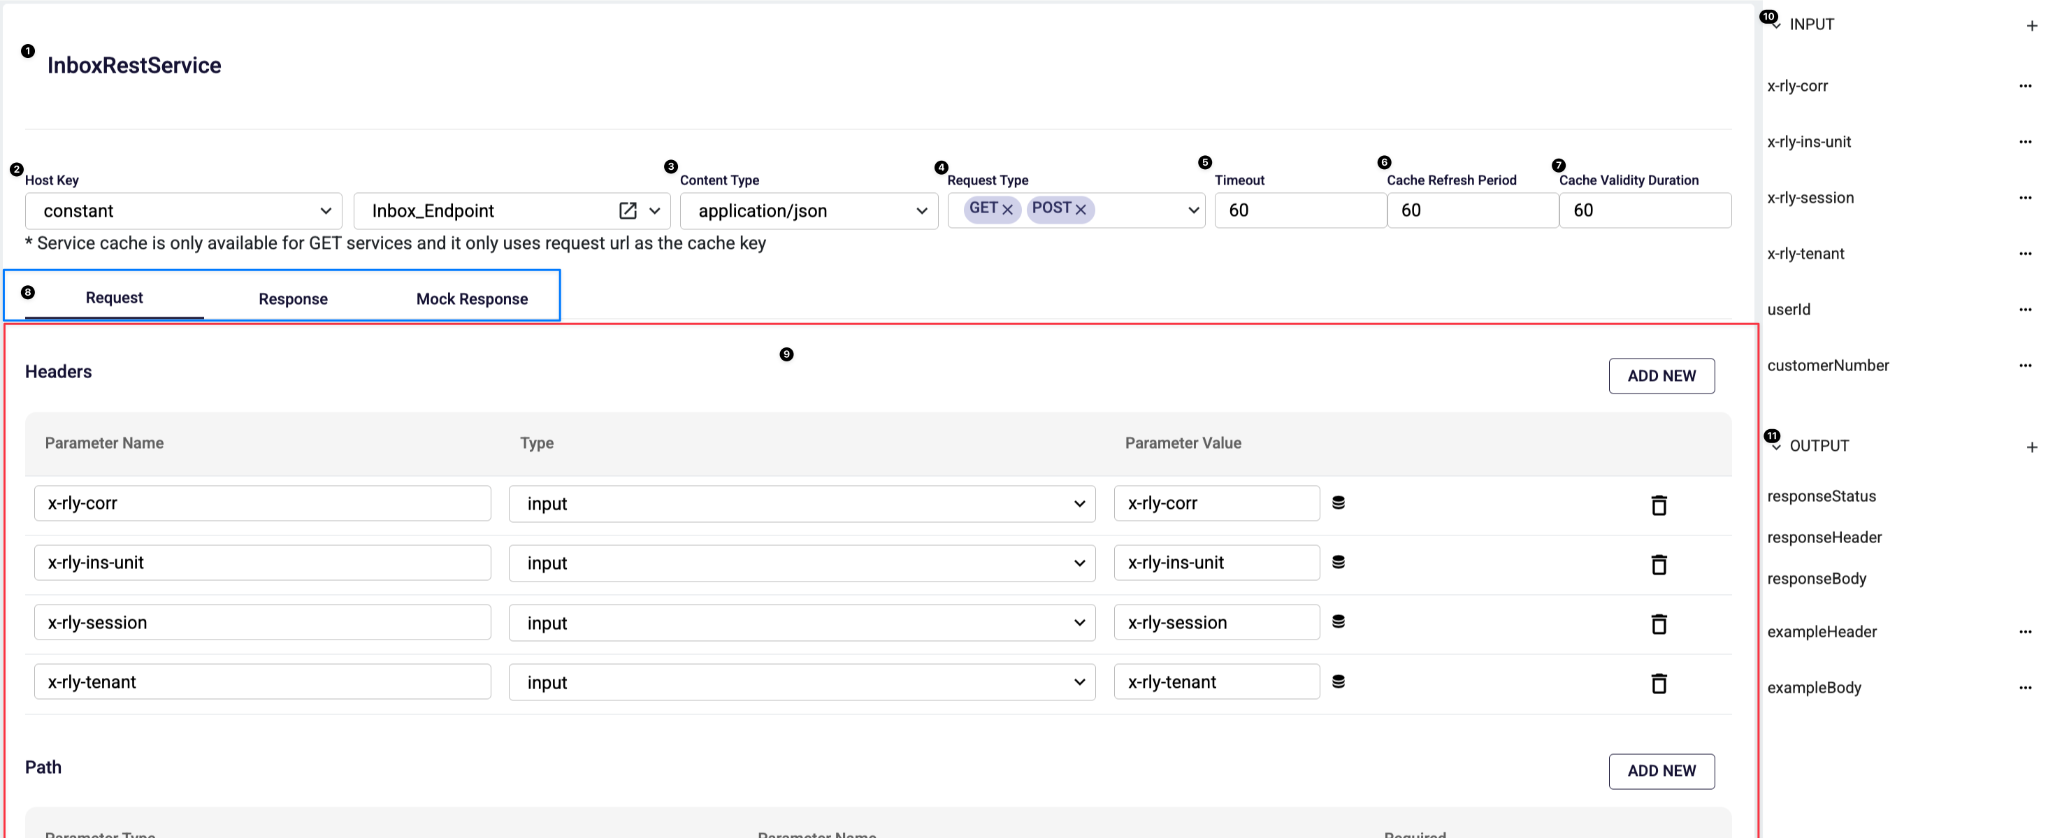
Service Name (1) : The name of the REST service. It is the identifier used when referencing this service elsewhere.
Host Key (2) : Defines how the target host/base URL is resolved.
- The left dropdown indicates the source type.
- string : In the value , gets static string
- literal : In the value , gets string that evaluated
- input : In the value , gets from input values by storepicker
- constant : In the value , gets from constant model by environment
Content Type (3) : Sets the request Content-Type . This impacts how request bodies are serialized and how the server interprets the payload. Possible options are application/json and application/x-www-form-urlencoded.
Request Type (4) : Defines which HTTP method(s) this service can execute (e.g., GET, POST). Multiple methods can be enabled depending on how your platform models the service.
Timeout (5) : Request timeout in seconds. If the external call doesn't complete in this time, the service fails with a timeout.
Cache Refresh Period (6) : Controls how often a cached GET response should be refreshed/revalidated.
Cache Validity Duration (7) : Controls how long a cached GET response remains valid (TTL).
Tabs: Request / Response / Mock Response (8) : Switches the editor mode
- Request: Build request parameters (headers, path, query, body).
- Response: Map HTTP response parts into outputs.
- Mock Response: Define static responses for testing and local development.
Tab Content Workspace (9) : The main configuration area for the selected tab.
Input Panel (10) : Lists all inputs that can be referenced in Request/Response/Mock mappings. Users can add new inputs and use them as dynamic values inside headers/path/query/body.
Output Panel (11) : Defines what the service returns. User can define custom response but
There are 3 default response :
- responseStatus: HTTP status code / status info
- responseHeader: Response headers
- responseBody: Response payload/body
Request Tab
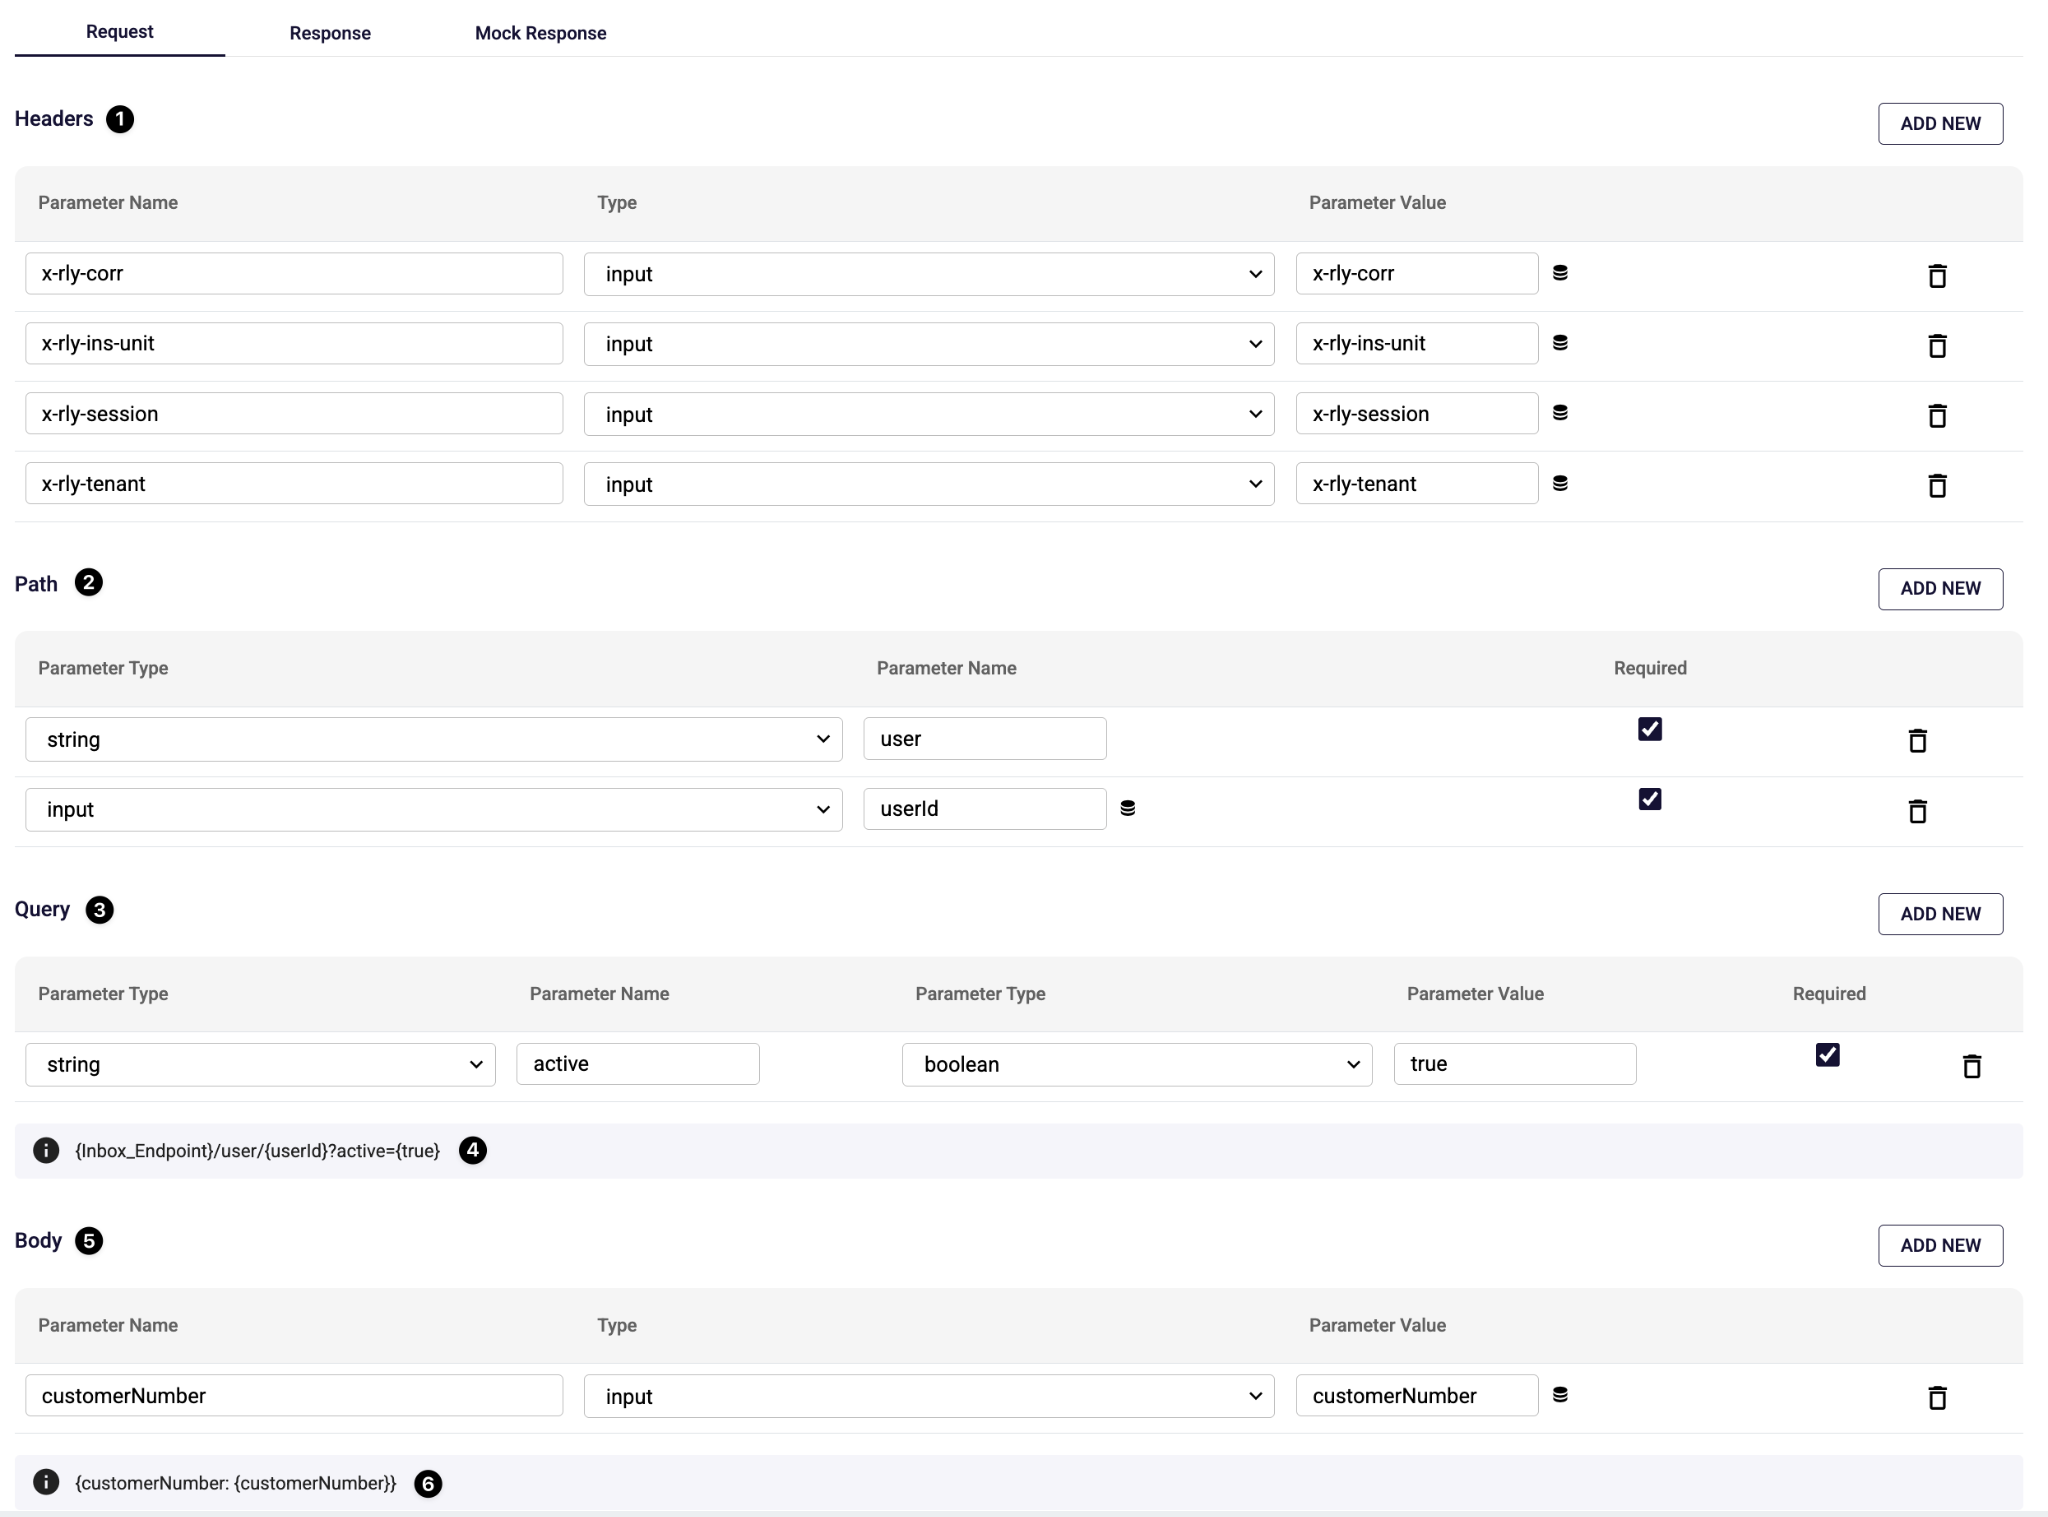
The Request tab is the area where the HTTP request of a REST service call is defined. Through this tab, the headers, path parameters, query parameters, and body content of the request going to the external service are configured. All fields can be dynamically bound with input, constant, or static values.
Headers (1): The Headers section is where the header fields to be sent along with the HTTP request are defined. Each header row consists of the following fields:
- Parameter Name: HTTP header name
- Type: The source of the header value
- string: In the value, gets static string
- literal: In the value, gets string that evaluated
- input: In the value, gets from input values by storepicker
- constant: In the value, gets from constant model by environment
- Parameter Value: The entered value or the constant or input it points to
- Delete icon: Removes the corresponding header
Path (2): The Path section is used to define dynamic path parameters of the endpoint URL. For each path parameter:
- Parameter Type: The data type of the parameter
- string: In the value, gets static string
- literal: In the value, gets string that evaluated
- input: In the value, gets from input values by storepicker
- constant: In the value, gets from constant model by environment
- Parameter Name: The parameter name within the URL
- Required: Whether the parameter is mandatory or not
Query (3): The Query section is the area where query parameters to be appended to the request URL are defined. Each query parameter consists of the following fields:
- Parameter Name: Query parameter name (e.g., active)
- Parameter Type (Value Type): The type of the parameter value (e.g. boolean)
- Parameter Value: Static value or input
- Required: Whether the parameter is mandatory or not
Request URL Preview (4): This field shows a preview of the actual request URL formed by combining the defined Host Key, Path, and Query parameters. Thanks to this preview area, it can be clearly seen which URL the request will be sent to.
Body (5): The area where the payload content of the HTTP request is defined. It is used in POST services. For each body parameter:
- Parameter Name: JSON field name
- Type: The source of the value
- string: In the value, gets static string
- literal: In the value, gets string that evaluated
- input: In the value, gets from input values by storepicker
- constant: In the value, gets from constant model by environment
- Parameter Value: Parameter value
Body Preview (6): The Body Preview area shows a preview of the JSON payload composed of the defined body parameters. This makes it easier to verify that the request body is formed in the correct format.
Response Tab
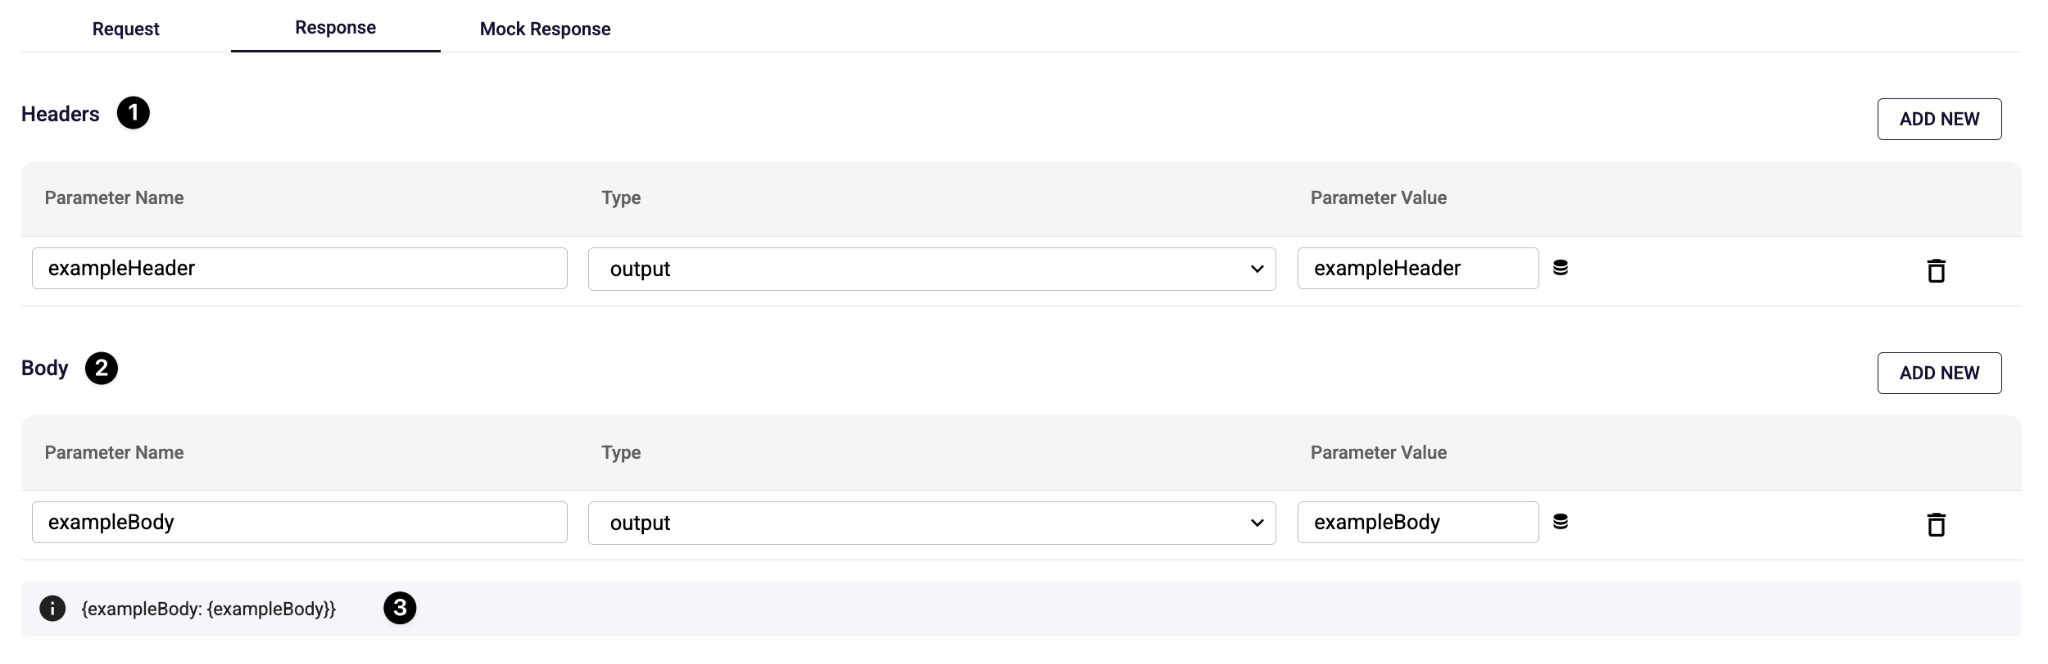
The Response tab is the area where you define how the response returned from the external REST service will be received within the workflow / business process and which outputs it will be mapped to. In this tab, the header and body parts of the HTTP response are bound to output variables. Thanks to this structure, the data returned from the external service can be used within the workflow.
Headers (1): The Headers section is the area where HTTP response header values returned from the external service are mapped to workflow outputs. Each header row consists of the following fields:
- Parameter Name: The expected response header name from the external service
- Type: The target of the value (output, context)
- Parameter Value: The target output variable to which the value will be mapped
- Delete icon: Removes the corresponding header mapping
Body (2): The Body section is the area where the REST service response body is mapped to workflow outputs. Each body row:
- Parameter Name: The field name within the response body
- Type: Target type (output, context)
- Parameter Value: The target output variable to which the value will be mapped
Body Preview (3): The Body Preview area shows a preview of the output JSON structure that will be formed as a result of the defined body mappings.
Mock Response Tab
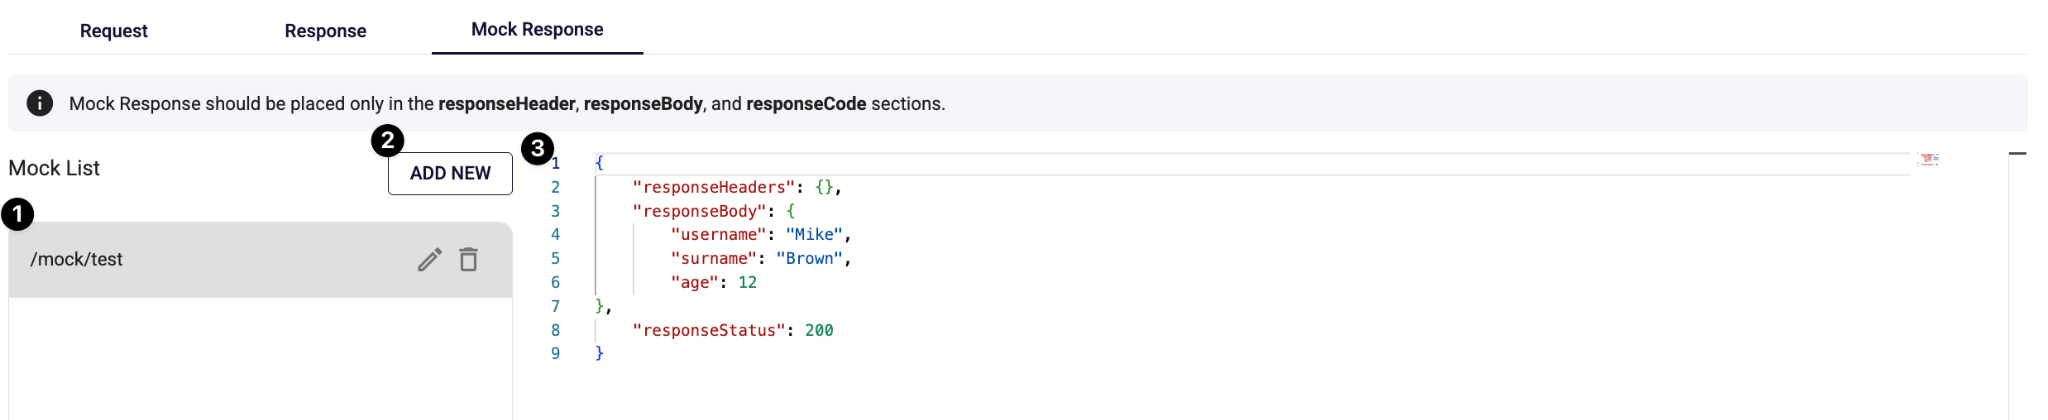
Used to produce a simulated (mock) response of a service call without actually calling an external REST service. This tab especially allows workflow flows to be tested independently during development.
Mock Response definitions only cover the responseHeader, responseBody, and responseStatus fields.
Mock List (1): The Mock List section is the area where all defined mock response records are listed. Each mock record:
- Is associated with a specific mock path (e.g., /mock/test)
- Can be edited (edit icon)
- Can be deleted (delete icon)
Add New (2): The Add New button is used to create a new mock response definition.
Mock Response Editor (3): This area is the JSON editor where the response content of the selected mock response is defined. A mock response should only contain the following fields:
- responseHeaders: Represents the HTTP response headers
- responseBody: Represents the HTTP response body content
- responseStatus: Represents the HTTP status code value
FAQ
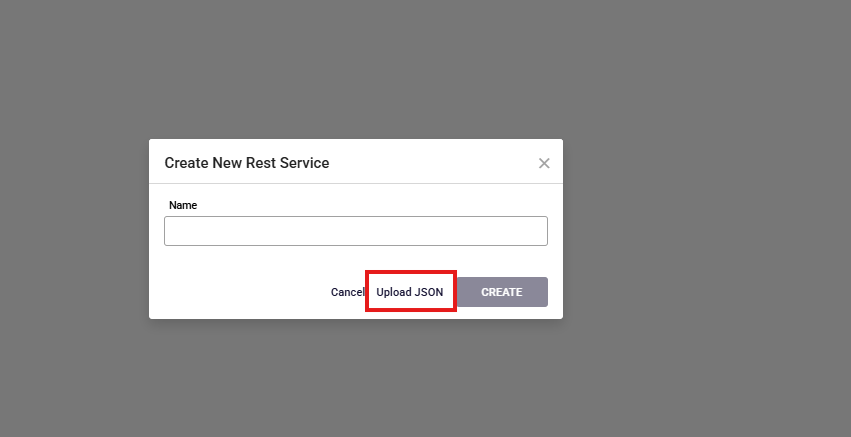
How to Gemerate a Rest Service From Swagger?
To generate rest service, click the Add New button located in the navigation menu on the left side of the page. From the dropdown menu, select the New Rest Service option. Next, upload the json file and click the Create button.
Select the api you want to generate, and click the Generate button to create the REST services.

References
Rest Service